Excel to Component Interface Utility


To use the Excel to Component Interface utility, you must grant access to the iScript WEBLIB_SOAPTOCI in the permission list of the user who is building the template.

Access the Connect Information tab in ExcelToCI2007.xlsm by clicking the Connect Information tab:

Image: Connect Information tab

This example illustrates the Connect Information tab in the Excel to Component Interface Utility.
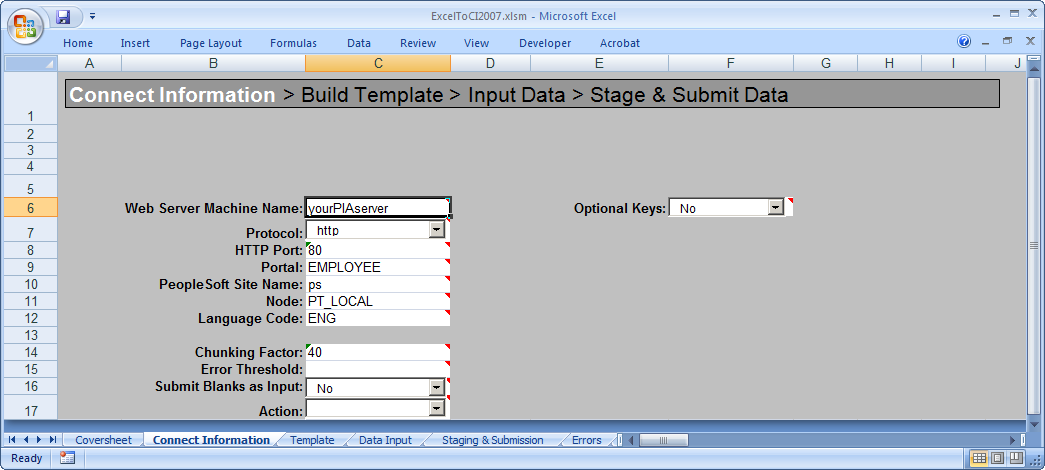
Connect Information tab in Excel to Component Interface utility.

The information on this page is required to create a new template or to submit data to the database. You will need to specify environment information as well as information about how data should be transmitted. The Action field will be populated automatically based on your setup and the component interface that the template is associated with.

The initial connection settings will be the PeopleSoft default values. You will need to modify these values for your specific implementation of PeopleSoft. If you are unsure what to enter for these values, check with your system administrator.

The connection options are:

Field or Control

Definition

Web Server Machine Name

The name of the PeopleSoft web server to which you are connecting.

Protocol

The protocol used to access the web server. The default is HTTP. The preferred protocol is HTTPS.

HTTP Port

The HTTP port number that the web server uses. The default is 80.

Portal

The name of the portal you are using. EMPLOYEE is a default portal shipped with PeopleSoft.

PeopleSoft Site Name

The PeopleSoft site name that you entered when you installed the PeopleSoft Internet Architecture. The default is ps.

Node

The PeopleSoft default local node name. The default is PT_LOCAL.

Language Code

The code for the language in which the data is submitted to the database. If no language code is specified, the base language is used.

Chunking Factor

The number of rows of data to be transmitted to the database at one time. The default is 40.

Error Threshold

The total number of errors that are permitted before submission to the database ceases. When the error threshold is exceeded, an error message appears and submission to the database stops.

Submit Blanks as Input

When this option is set to Yes and a character input field selected for input contains only blank spaces, the field will be included for submission instead of being ignored. This option is set to No by default, for backwards compatibility.

If full-width blank space Unicode characters are entered as an input value in ExcelToCI, (this is achieved by using an encoding that supports such Unicode characters) the field will be submitted, the blanks will be sent, and the value will not be trimmed before it is saved to the database.

If regular ASCII blank spaces (also known as half-width characters) are entered as a value for a character field, the field will be submitted, but the value will be trimmed, so an empty string will be saved. In essence, the field value will be cleared.

Action

The value for this field is supplied by the system when the component interface is retrieved from the database. However, you can change the supplied value by selecting it from the Action drop-down list.

The types of actions available are based on the structure of the component interface. The actions are:

  • Create.

    This option is available if the component interface has create keys. Use this mode when new keys are being added at level 0.

  • Update.

    This option is available if the component interface does not have create keys. Use this mode if you are adding new children to an existing parent.

  • UpdateData.

    Use this option to update specific non-key values that already exist. The system uses the keys to locate the row, and when a match is found, the row is updated with new data. If a key match is not found by the system, it displays an error message indicating which collection was missing a key match.

    When using the UpdateData action, you must provide all keys for the collection for the system to modify the data.

Note: If you want to insert an effective-dated collection at Level 1 containing a child collection at Level 2, you may need to use UPDATE to insert the parent row at level 1 and then use UPDATEDATA to insert the child row at level 2. This is because child rows are copied forward from the current effective-dated collection as a result of the insertion of a new effective-dated parent row. These child rows will be updated by the component processor with the new effective date, and may have the same level 2 keys as the Level 2 child row that you are trying to submit from ExcelToCI.

Creating Templates

The template page is a graphical representation of the component interface structure that you will be using to load data. The structure of the component interface is retrieved from the database when a new template is built. All of the fields that are exposed through the component interface appear on the template page. Fields that are read-only on the component interface will not appear on the template.

The new template macro builds the parent-child relationship within Microsoft Excel based upon the component interface scroll-level definition. The system adds a new row for each scroll level and assigns a unique identifier to it.

Access the Template tab in ExcelToCI.xlsm to create your template:

Image: Template tab in Excel to Component Interface Utility.

This example illustrates the Template tab in the Excel to Component Interface utility.
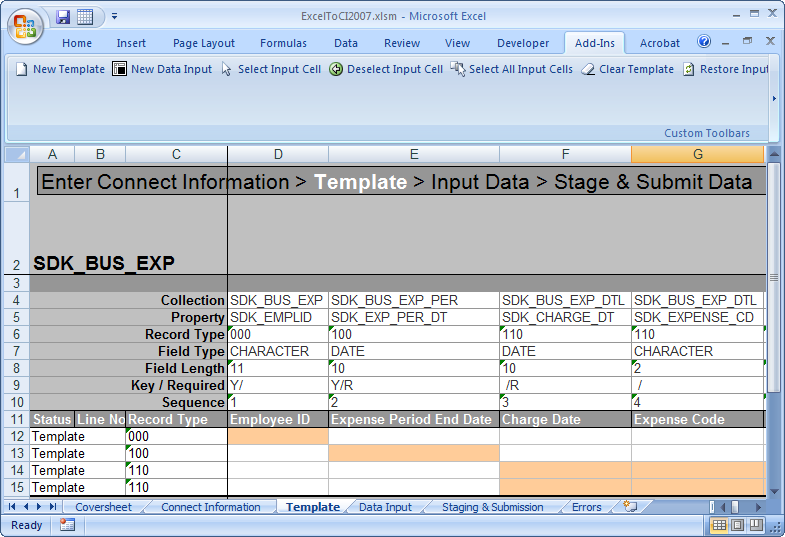
Template tab in Excel to Component Interface utility.

Field or Control

Definition

Collection

The name of the component interface collection. A collection is a property that points to a scroll, rather than a field, in the underlying component for a component interface.

Property

The component interface property name. Typically, this is also the name of the field on the page.

Record Type

This number represents the parent/child relationship of the records. The level 0 scroll record is always represented by 000. Level 1 scroll records appear with numbers that start with 100 and always have 00 as the last two numbers.

Level 2 scrolls are identified by numbers that start with the identifier of their level 1 parent and end with a 0.

Level 3 scrolls are identified by the first number from the level 1 parent, the second number from its level 2 parent, and then the third number from its own position in the list.

The numbers for each scroll level increments based on the number of records that exist at that level. For example, level 0 would be 000, level 1 would be 100, level 2 would be 110, and so on.

Note: Component interfaces that have more than 10 collections at a given level increments with alphabetic identifiers. For example, 800, 900, A00, and so on.

Field Type

The standard PeopleSoft type for the field, for example, Date, Character, and so on.

Field Length

The length of the field as defined by PeopleSoft. For numeric fields and signed number fields, the length is broken down into integer and decimal positions. For example, a length of 15.3 indicates 15 integer positions and three decimal positions.

Key/Required

If the field is a key field, the system will display a Y to the left of the forward slash. When the field is not a key, it will be blank. If the field is a required field, the system will display an R to the right of the forward slash. When the field is not required, it will be blank. This information comes from the record definition itself.

Note: Fields that are either keys or required must be set in order to submit data successfully.

Sequence

The sequence number represents the property order in the template.

Status

This field displays the load status on the Staging and Submission page.

Line No

This corresponds to the line number on the Input Data and the Staging and Submission pages.

PeopleCode to retrieve Google map between two addresses


PeopleCode Example:

/* Define constants for the API request */

Local string &origin = "123 Main St, Anytown, USA";  /* Replace with the starting address */

Local string &destination = "456 Elm St, Othertown, USA";  /* Replace with the destination address */

Local string &apiKey = "YOUR_GOOGLE_MAPS_API_KEY";  /* Replace with your Google Maps API Key */


/* Construct the Google Maps API URL */

Local string &baseUrl = "https://maps.googleapis.com/maps/api/directions/json?";

Local string &url = &baseUrl | "origin=" | %EncodeURL(&origin) | "&destination=" | %EncodeURL(&destination) | "&key=" | &apiKey;


/* Create an HTTP request object */

Local object &http = CreateObject("HttpClient");

Local integer &status;


/* Send the HTTP GET request */

&status = &http.Get(&url);


/* Check if the request was successful */

If &status <> 0 Then

   /* Handle error */

   MessageBox(0, "", 0, 0, "Error sending request to Google Maps API: " | &http.GetLastError());

Else

   /* Parse the JSON response */

   Local string &response = &http.GetResponseText();

   Local object &jsonResponse = JSON.Parse(&response);


   /* Check if the response contains routes */

   If All(&jsonResponse.Routes) Then

      Local object &route = &jsonResponse.Routes[1];


      /* Retrieve route details */

      Local string &summary = &route.summary;

      Local string &distance = &route.legs[1].distance.text;

      Local string &duration = &route.legs[1].duration.text;


      /* Display the results */

      MessageBox(0, "", 0, 0, "Route: " | &summary | Char(13) | "Distance: " | &distance | Char(13) | "Duration: " | &duration);

   Else

      /* Handle no routes found */

      MessageBox(0, "", 0, 0, "No routes found between the specified addresses.");

   End-If;

End-If;


Example-2: Here you can use two strings as input parameter from page

Local string  &Fromaddr,&Toaddr;

&Fromaddr = SY_MAPS_INT_WRK.SY_FROM_LOCATION.Value;
&Toaddr = SY_MAPS_INT_WRK.SY_TO_LOCATION.Value;

&Map_Selection = “http://maps.google.com/maps?saddr=%FromAddr%&daddr=%ToAddr%&#8221;;
&Map_Selection = Substitute(&Map_Selection, “%FromAddr%”, &Fromaddr);
&Map_Selection = Substitute(&Map_Selection, “%ToAddr%”, &Toaddr);
ViewContentURL(&Map_Selection, True);


Advanced Integration Steps

Handling Different Travel Modes

Google Maps Directions API supports multiple travel modes such as driving, walking, bicycling, and transit. You can modify the request URL to specify a travel mode.

/* Define the travel mode */

Local string &travelMode = "driving";  /* Options: driving, walking, bicycling, transit */


/* Construct the Google Maps API URL with travel mode */

Local string &url = &baseUrl | "origin=" | %EncodeURL(&origin) | "&destination=" | %EncodeURL(&destination) | "&mode=" | &travelMode | "&key=" | &apiKey;


Optimizing API Requests

Waypoints: If you want to include intermediate stops in your route, you can add waypoints.

Local string &waypoints = "via:123+Main+St,Anytown,USA|via:789+Oak+St,Newtown,USA";  /* Example waypoints */

Local string &url = &baseUrl | "origin=" | %EncodeURL(&origin) | "&destination=" | %EncodeURL(&destination) | "&waypoints=" | &waypoints | "&key=" | &apiKey;


Departure Time: For transit mode, you can specify a departure time to get more accurate directions.

Local string &departureTime = "now";  /* You can also use a specific timestamp */

Local string &url = &baseUrl | "origin=" | %EncodeURL(&origin) | "&destination=" | %EncodeURL(&destination) | "&mode=" | &travelMode | "&departure_time=" | &departureTime | "&key=" | &apiKey;


Enhanced Error Handling

Implement more comprehensive error handling to deal with different types of errors, including network issues, invalid API responses, and more.

If &status <> 0 Then

   /* Handle HTTP errors */

   MessageBox(0, "", 0, 0, "HTTP Request Error: " | &http.GetLastError());

Else

   /* Parse the JSON response and check for API-specific errors */

   Local object &jsonResponse = JSON.Parse(&http.GetResponseText());


   If All(&jsonResponse.Status = "OK") Then

      Local object &route = &jsonResponse.Routes[1];

      /* Proceed with parsing and displaying route information */

   Else

      /* Handle API-specific errors */

      Local string &errorMessage = &jsonResponse.Error_message;

      MessageBox(0, "", 0, 0, "Google Maps API Error: " | &errorMessage);

   End-If;

End-If;

Data Parsing and Utilization

You can extract additional details from the API response, such as steps in the route, estimated arrival times, and more.


Local object &leg = &route.legs[1];

Local array of object &steps = &leg.steps;


For &i = 1 To &steps.Len

   Local object &step = &steps[&i];

   Local string &instruction = &step.html_instructions;

   Local string &stepDistance = &step.distance.text;

   Local string &stepDuration = &step.duration.text;


   /* Display or process each step in the journey */

   MessageBox(0, "", 0, 0, "Step " | &i | ": " | &instruction | " (" | &stepDistance | ", " | &stepDuration | ")");

End-For;


Security Enhancements

  • Secure API Key Storage: Store the API key securely within PeopleSoft, using configuration or encrypted storage options to prevent exposure in the codebase.
  • Use of Environment Variables: Instead of hardcoding the API key, use environment variables or secure PeopleSoft configuration values to inject the key at runtime.

User Interface Integration

If you want to display the map within a PeopleSoft page, you can embed a Google Maps iframe using the map URL. Alternatively, you can use JavaScript on a PeopleSoft page to display dynamic map content.


Sample Code for XML-to-JSON and JSON-to-XML Conversion

 import PT_INTEGRATION:CIRESTDefinition;


Local PT_INTEGRATION:CIRESTDefinition &oConvert = create PT_INTEGRATION:CIRESTDefinition();

Local string &sJSON, &sXML;

Local XmlDoc &xmlDoc, &retXmlDoc;


&sXML = GetHTMLText(HTML.XPPHTMLX);

&xmlDoc = CreateXmlDoc(&sXML);

&sJSON = &oConvert.convertXMLtoJSON(&xmlDoc);

WinMessage(&sJSON, 64);

REM XPPJSONX - create an HTML object and paste the JSON from above into this HTML so that it can be compared with the original XML;

&retXmlDoc = &oConvert.convertJSONtoXML(GetHTMLText(HTML.XPPJSONX));

WinMessage(&retXmlDoc.GenFormattedXmlString(), 64);

Generating LARGE JSON Files for your IB


The PeopleCode native JsonObject and JsonArray classes allow us to create JSON structures as in-memory representations. But what if you need to generate a really LARGE JSON structure? An in-memory JSON Array may consume more memory than you can reasonably allow. Fortunately, PeopleTools includes the Jakarta JSON library, which allows us to write a JSON structure to a stream during construction.

The following code snippet demonstrates creating 10 million JSON objects in an array without any change in memory consumption. The generated file was 2.5 GB in size, but my memory utilization didn't change the entire time the program ran.

Local JavaObject &Json = GetJavaClass("jakarta.json.Json");
Local JavaObject &writer = CreateJavaObject("java.io.FileWriter", "C:\temp\users-big.json");

Local JavaObject &gen = &Json.createGenerator(&writer);

Local number &iteration = 1;

REM ** 10 million iterations;
Local number &maxIterations = 10000000;

&gen.writeStartArray();

For &iteration = 1 To &maxIterations
   
   REM ** start person/user object;
   &gen.writeStartObject();
   &gen.write("id", "" | &iteration);
   &gen.write("firstName", "John");
   &gen.write("lastName", "Smith");
   
   REM ** start child address object;
   &gen.writeStartObject("address");
   &gen.write("streetAddress", "21 2nd Street");
   &gen.write("city", "New York");
   &gen.write("state", "NY");
   &gen.write("postalCode", "10021");
   &gen.writeEnd();
   
   REM ** start phone number array;
   &gen.writeStartArray("phoneNumber");
   
   REM ** start home phone object;
   &gen.writeStartObject();
   &gen.write("type", "home");
   &gen.write("number", "212 555-1234");
   &gen.writeEnd();
   
   REM ** start fax number object;
   &gen.writeStartObject();
   &gen.write("type", "fax");
   &gen.write("number", "646 555-4567");
   &gen.writeEnd();
   
   REM ** end array of phone numbers;
   &gen.writeEnd();
   
   REM ** end person/user object;
   &gen.writeEnd();
End-For;


REM ** end array;
&gen.writeEnd();

REM ** cleanup to flush buffers;
&gen.close();
&writer.close();

The hard-coded values come directly from the Jakarta generator API documentation. In real life, you would replace these values with database data. I converted numbers to strings to simplify the example to avoid Java Reflection.

Are you interested in parsing rather than generating large JSON files? Check out our post on JSON Stream Parsing.

We teach PeopleTools and PeopleCode tips like this every week! Check out our upcoming course schedule to see what we are offering next! We would love to have you join us. Want to learn at your own pace? Check out our subscriptions and on-demand offerings as well. Or do you have a group you would like to train? Contact us for group and quantity discounts.

Excel to Component Interface Utility

  To use the Excel to Component Interface utility, you must grant access to the iScript WEBLIB_SOAPTOCI in the permission list of the user w...