Understanding Page Composer

The Page Composer feature enables users to design their own Fluid Application Pages to make it more in line with the business needs. The feature allows users to design pages for different form factors and to include fields and tabs using the registered components delivered with the feature. It is metadata driven so the users can modify the styling and layout of select areas on component pages without having to code or customize delivered PeopleSoft application pages.


WorkCenter Dashboard Configuration – Part-1

Here is the step by step process on how to configure a workcenter in peoplesoft.

1. Configure Navigation Collection

PeopleTools > Portal > Portal Utilities > Navigation Collections

  • Click Add Collection
  • Enter a name for your navigation collection
  • Add Links to Menu Items and Folders as needed for your navigation collection

Configure Navigation Collection in PeopleSoft

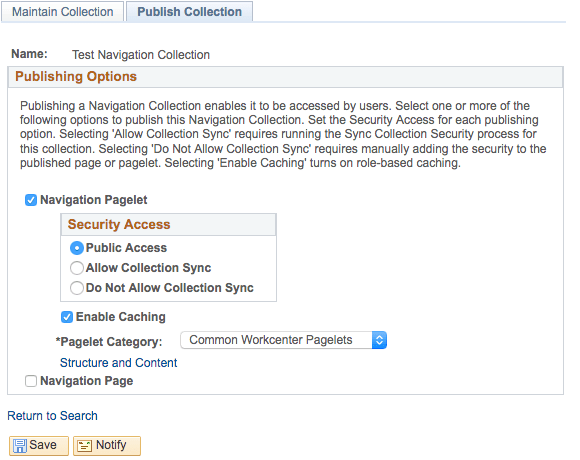
  • Click Publish Collection Tab
  • Click Navigation Pagelet Checkbox
  • Select category for pagelet in the Pagelet Category Dropdown (Common WorkCenter Pagelets is what I selected)
  • Click Save

Publish Navigation Collection in PeopleSoft

2. Configure WorkCenter Dashboards

PeopleTools > Portal > WorkCenter > Manage WorkCenter Dashboards

  • Click Create new WorkCenter dashboard page (at the bottom of the page)
  • Enter the name for your dashboard in the Dashboard Name field (this isn’t actually the name displayed)
  • Enter the label for your dashboard in the Dashboard Label field (this is what is displayed as the name)
  • Select the parent folder from the Parent Folder field (this is the menu item your users will access your workcenter from)
  • Click Save

Configure WorkCenter Dashboard in PeopleSoft

  • Common WorkCenter Pagelets in PeopleSoft DashboardsClick the Pagelets button next to your new workcenter dashboard
  • Click the checkbox next to the Navigation Collection you configured in step 1 above (it is in the category you selected when you created the navigation collection)
  • Select the Required Option
  • Click Save

3. Configure WorkCenter Page

PeopleTools > Portal > WorkCenter > Manage WorkCenter Pages

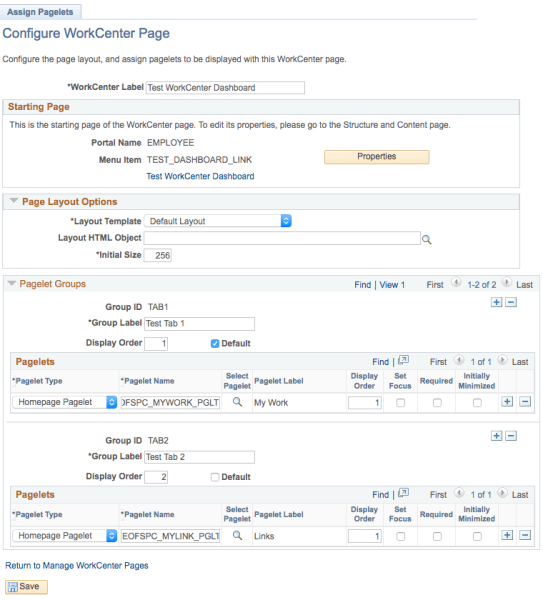
  • Click Create new WorkCenter page (at the bottom of the page)
  • Select WorkCenter dashboard page and choose the workcenter dashboard you configured in step 2 above
  • Enter a pagelet group ID and label (these will be the tabs on the left side of your workcenter)
  • Add Pagelets to your group(s) (common workcenter pagelets are Links, My Work, Queries, and Reports/Processes)
  • Click Save

Configure WorkCenter Page in PeopleSoft

4. Configure WorkCenter Pagelets

Enterprise Components > WorkCenter/Dashboards > Configure Pagelets

  • Click Add a New Value
  • Enter a Configuration ID
  • Enter a Description
  • Select the WorkCenter Menu Item of the workcenter page you configured in step 3 above
  • Select the Dashboard/Homepage Menu Item of the workcenter dashboard you configured in step 2 above
  • Click Save

Configure WorkCenter Pagelets in PeopleSoft

You can now configure My Work, Links, Queries, and Reports/Processes by selecting the proper tab. A very important hint is that after clicking save on the page for configuring each pagelet you must also click the Activate Settings button.


PeopleSoft WorkCenter

You should now be able to navigate to your newly created peoplesoft workcenter using the menu item you configured in step 2 above.


Few things every PeopleSoft Consultant should know

Excel2CI:-
Four step process:-
  1. Connection
  2. Template
  3. Data Input
  4. Staging and Submission
Grant access to the WEBLIB_SOAPTOCI iScript.
Chunking Factor - Number of rows of data to be transmitted to DB at one time , Default one is 40.
Excel allows a maximum 252 columns and 65,000 rows.
The numbers for each scroll level are incremented based on the number of records that exist at that level. For example:
Level 0 would be 000, 
Level 1 would be 100 and level 2 would be 110, and so on.

SQR:-
Maximum file can be open in a SQR program is - 12
In Begin-Select paragraph we can control mannualy the no of rows retrive from select statement
Example Begin-Select Loops=n
Unstring is use as simplar to PeopleCode Spit when reading a line from file and storing into variable.   
Example: Unstring <variable name>  by <separator - pipe/comma/Tab etc>  into <var-1> <var-2> etc

Load-Lookup example:-
!load lookup for department
let $where = 'dpt.effdt = (select max(effdt) from ps_dept_tbl'
|| ' where setid = dpt.setid '
|| ' and deptid = dpt.deptid and effdt <= '
|| '''' || $asofdate || ''')'
|| ' and dpt.eff_status = ''A'''
Load-Lookup
name = deptid
rows = 20000
table = 'ps_dept_tbl dpt'
key = 'setid || '','' || deptid'
return_value = 'company || '';'' || gl_expense || '';'' || manager_id || '';'' || paygroup || '';'' || location'
where = $where

let $search = {SETID} || ',' || &jb1.deptid

lookup deptid $search $ret_val
unstring $ret_val by ';' into $dept_tbl_company $dept_tbl_gl_expense $dept_tbl_manager_id $dept_tbl_paygroup $dept_tbl_location  

Initial Capital later Logic using SQR:-
! Procedure: PROPER-FORMAT                                                                  !
!            This procedure accepts a string and return with proper format as well as it
!            remove the special character from the input string. 
BEGIN-PROCEDURE PROPER-FORMAT($City,:$outputstring)
#ifdef debugx
  display 'Entering INITCAP.SQC: PROPER-FORMAT'
#end-if

!Trim each field for blanks
let $String1=ltrim(rtrim($City,' '),' ')

!Check for special Character in the string
let $valid_chars ='ABCDEFGHIJKLMNOPQRSTUVWXYZabcdefghijklmnopqrstuvwxyz0123456789 ' 
let $invalid_chars = translate($String1,$valid_chars,'') 
let #invalid = length($invalid_chars) 

!Remove special Character in the string 
while #invalid > 0
let $String1 = translate($String1,$invalid_chars,' ') 
let $invalid_chars = translate($String1,$valid_chars,'') 
let #invalid = length($invalid_chars) 
        end-while

DO INITCAP-FORMAT($String1,$outputstring)

END-PROCEDURE PROPER-FORMAT
!--------------------------------------------------------------------------------------------!
!Procedure : INITCAP-FORMAT 
!Description: This procedure will change the string to initial capital
!--------------------------------------------------------------------------------------------!
BEGIN-PROCEDURE INITCAP-FORMAT($String1,:$outputstring)

  Let #count=0
  let #total=length($String1)
  Let $currentval=''
  Let $nextval=''
  while  #count <= #total
  if Substr($String1,#count, 1)=' '
  
  let $currentval=Upper(Substr($String1, #count+1, 1))
  Let $nextval=$nextval||$currentval
 
  else 
  if #count=0 
  let $currentval=Upper(Substr($String1, #count+1, 1))
  Let $nextval=$nextval||$currentval
        else
                Let $currentval=lower(Substr($String1, #count+1,1))
                Let $nextval=$nextval||$currentval
  end-if
  end-if
  let #count=#count+1
  end-while
  Let $outputstring=$nextval

END-PROCEDURE INITCAP-FORMAT  

PeopleCode:-
Open an Email Client(Outlook) from PeopleCode:-
&sEmail = "mailto:someone@example.com?Subject=Hello";
ViewContentURL(&sEmail);

UpdateValue function to update the value of a specified field with the value provided. The value must be of a data type compatible with the field. Example:-
UpdateValue(RECORD.ASGN_CMP_EFFDT,CurrentRownumber(), ITEM_SELECTED, "Y");

FetchValue function to return the value of a buffer field in a specific row of a scroll level. Example:-
&VAL = FetchValue(SCROLL.DEPEND, CurrentRownumber(), DEPEND.DEPEND_ID);

Use the PriorValue function in FieldEdit and FieldChange PeopleCode to obtain the prior value of a buffer field that the user just changed.Example:-
&PRIOR = PriorValue(QUANTITY);

Use the RemoveDirectory function to remove the directory specified by path.
RemoveDirectory("C:\temp\mydir\temp", %filepath_absolute + %remove_subtree);

Use the RenameDBField function to modify a field definition to have a new name. Example:-
&oldcf = "CF1"; &newcf = "XYZ_STORE_ID"; &new = "FIELD." | &newcf; &old = "FIELD." | &oldcf; &ret = ​RenameDBField(@(&new), @(&old));

Use the RenameRecord function to modify a record definition to have a name. 
&ret = ​RenameRecord(RECORD.OrgIdTbl, RECORD.DeptIdTbl);

Use the Days365 function to return the number of days between the Date values date_val1 and date_val2 using a 365-day year. Example:-
&NUMDAYS = Days360(TERM_START_DT, PMT_DT);

AE:-

Application Engine with Disable Restart "off" is going "No Success" in PeopleSoft.

Now the question is, how to resolve this? 

First clear all the temporary processing data from the tables and then run the process again. But this is easier said than done. So lets break it down into the steps needed to resolve this issue.
1.Gather all the temporary table instances and standard SQL tables
In this step we need to collect the names of all the tables into which the program tries to insert the data. The easiest way to do this is by first enabling the Application Engine trace and then checking the SQL trace file. Just search all the INSERT INTO text in the SQL trace file which will give you all the tables where the temporary or the transnational data is inserted.
2.Deleting the data from tables
In this step we will delete the data form all the tables gathered in previous step but perform this task very carefully so that we don't end up deleting any data which which isn't supposed to. First of all, all the data from temp tables can be deleted without any worry. However, before deleting the data from standard SQL tables, we first need to analyse and determine what exactly need to be deleted or updated and only after that data should be deleted.
Run the process again


We can call Section Dynamically from SQL Action (Using Case Contruct) and PeopleCode Action

Meta-SQL Reference:-
%AeSection -This meta-variable to specify a quoted string containing the currently executing Application Engine section name.
%AeStep -This meta-variable to specify a quoted string containing the currently executing Application Engine Step name.

%Session or GetSession();

Exampele:-
Local AESection &Section; &Section = GetAESection("RULES", "DYN_SECT"); /* Open the base section */ &Section.SetTemplate("MY_APPL", "TEMPLATE"); /* Set the template section */ &Section.AddStep("NewStep2"); /* Insert NewStep2 */ /* Do some SQL stuff here */ &Section.SetSQL("DO_SELECT", &MySql); /* Modify the SQL in the added step */ &Section.Save(); &Section.Close(); /* Save and close */

CI:
If the user running the CI and the target page is display only for the user then data will not insert/update to the target.

Tools:
Page and Field Configurator available in release Tools Release 8.58 using Page Composer.


Provide a REST web service in PeopleSoft -Part-2

This document describes a simple example on how to provide a REST web service from PeopleSoft.

We are going to provide a service that returns the ISO2 code and the name of a country. The input will be an ISO3 country code.

Content

  • Step 1: Define documents
  • Step 2: Define messages
  • Step 3: Create service
  • Step 3a: Define security
  • Step 3b: Set request parameters
  • Step 3c: Set response parameters
  • Step 4: Create a handler
  • Step 4a: Write handler code
  • Step 5: Provide the REST service
  • Step 6: Testing

Step 1: Define documents

Define documents for input and output messages. Go to: PeopleTools > Documents > Documents Builder

Create a new document with the following parameters, this will be the request:

PackageC_COUNTRY_INFO_REST_PKG
Document NameC_COUNTRY_INFO_REQ
Version Namev1

Set the root element to request and create a primitive called country_code_iso3. This should be a string of length 3.

On the JSON tab set the JSON label also to request.

Create a second document with the following parameters, this will be the response:

PackageC_COUNTRY_INFO_REST_PKG
Document NameC_COUNTRY_INFO_RESP
Version Namev1

Add two primitives here called country_code_iso2 and description. Make sure to set the proper type and length.

Step 2: Define messages

Go to: PeopleTools > Integration Broker > Integration Setup > Messages
Create two messages one for the request and one for the response. The request:

The response:

Step 3: Create service

Go to: PeopleTools > Integration Broker > Integration Setup > Services
Create a new web service named C_COUNTRY_INFO_REST. Don’t forget to check the Is Provider checkbox.

Save the service and add a new service operation named C_GET_COUNTRY_INFO:

On the general tab you have to do a couple of things:

  • Define security
  • Set request parameters
  • Set response parameters

Step 3a: Define security

Click on the Service Operation Security link and assign a permission list to the service operation. The user that calls the service must have this permission list assigned via a role to be able to execute the operation.

Step 3b: Set request parameters

In the URI scroll fill in, use the following as a template: country/{country_code_iso3}
The REST base URL is pre-populated. Your REST service will later be available on a URL which is the combination of the base URL and the template. In this example, if you want to query the Netherlands it will be:

http://*******:9084/PSIGW/RESTListeningConnector/PSFT_CORE/C_GET_COUNTRY_INFO.v1/country/NLD

As document template use the created request message.

Step 3c: Set response parameters

For the response setup use the created response  message and set content-type to application/json.

Step 4: Create a handler

On the “Handlers” tab of the service operation you have to link an application class which handles the requests and returns a response.
In Application Designer create an application package like in the example below:

As code use some place holder code so you can save the application package:

import PS_PT:Integration:IRequestHandler;

class Country implements PS_PT:Integration:IRequestHandler
   method Country();
   method OnRequest(&MSG As Message) Returns Message;
end-class;

/* constructor */
method Country
end-method;

method OnRequest
   /+ &MSG as Message +/
   /+ Returns Message +/
   /+ Extends/implements PS_PT:Integration:IRequestHandler.OnRequest +/
   /* Variable Declaration */
   
   Return Null;
end-method;

Now on the “Handlers” tab link the application package to the service operation as shown below.

Click on details and fill in the parameters as shown.

Step 4a: Write handler code

Now you can finish the handler code. See the example below.

import PS_PT:Integration:IRequestHandler;

class Country implements PS_PT:Integration:IRequestHandler
   method Country();
   method OnRequest(&MSG As Message) Returns Message;
end-class;

/* constructor */
method Country
end-method;

method OnRequest
   /+ &MSG as Message +/
   /+ Returns Message +/
   /+ Extends/implements PS_PT:Integration:IRequestHandler.OnRequest +/
   /* Variable Declaration */
   
   Local string &strISO3;
   Local Record &rcdCountryTbl;
   Local Document &docReq, &docResp;
   Local Compound &compReq, &compResp;
   Local Message &msgResp;
   
   /* Get input parameters from request */
   &docReq = &MSG.GetURIDocument();
   &compReq = &docReq.DocumentElement;
   &strISO3 = &compReq.GetPropertyByName("country_code_iso3").value;
   
   /* Message */
   If &MSG.HTTPMethod = %IntBroker_HTTP_GET Then
      /* Get ISO2 and country description */
      &rcdCountryTbl = CreateRecord(Record.COUNTRY_TBL);
      &rcdCountryTbl.COUNTRY.Value = &strISO3;
      If &rcdCountryTbl.SelectByKey() Then
         /* Create response mesage*/
         &msgResp = CreateMessage(Operation.C_GET_COUNTRY_INFO_GET, %IntBroker_Response);
         
         /* Get document and root compound */
         &docResp = &msgResp.GetDocument();
         &compResp = &docResp.DocumentElement;
         
         /* Set primitives */
         &compResp.GetPropertyByName("country_code_iso2").Value = Left(&rcdCountryTbl.COUNTRY_2CHAR.Value, 2);
         &compResp.GetPropertyByName("description").Value = Left(&rcdCountryTbl.DESCR.Value, 100);
      Else
         /* Do something to handle non existing countries.... this is not implemented in this example */
         /* Only the happy flow works */
      End-If;
   End-If;
   
   /* Return response */
   Return &msgResp;
end-method; 

Step 5: Provide the REST service

Go to: PeopleTools > Integration Broker > Web Service > Provide Web Service
Here search for the REST web service and go through the wizard to publish the service. This will provide a WADL which you can use to provide to 3rd parties so they can integrate.

Step 6: Testing

Like mentioned in step 3b you can now use the following URL to test your service:

http://<serverIP>:port/PSIGW/RESTListeningConnector/PSFT_CORE/C_GET_COUNTRY_INFO.v1/country/NLD

Just copy and paste it in your browser and you will get the result shown below:

For more thorough testing you can use a tool like SoapUI:

PeopleSoft Add-on: Mouse over Pop-up

 Using PeopleCode and injected with JavaScript:

PeopleCode Field Class provides a property called HoverText which you can use to display a tooltip/Hover text for any push buttons or hyperlink associated with the field.
To do that you can use something like;

RECNAME.FIELDNAME.HoverText = "This is HoverText Example";

A couple of limitation of using HoverText property:-

·         The maximum length of hover text is 100 characters

·         If the hover text is identical to the push button or hyperlink label, the hover text will not be shown

Steps:

  1. Add a field called HTMLAREA to a derived/work record (WORK_REC.HTMLAREA)
  2. Add record field (WORK_REC.HTMLAREA) to the page you want to the scroll level 0 (Make sure to reduce the size of the field in App designer and but ensure you can see it on the page). 
  3. In Page Activate Event write the below code:-

Note: Within JavaScript block we’ve to write underscore instead of dot marked bold.

Local string &cDoublequote = """";

WORK_REC.HTMLAREA.Value = "<script type=" | &cDoublequote | "text/javascript" | &cDoublequote | " language=" | &cDoublequote | "javascript" | &cDoublequote | ">" | "function yourFunctionName() { document.getElementById(" | Quote("RECNAME_FIELDNAME") | ").title=" | &cDoublequote | "This is the hover text for the RECNAME.FIELDNAME" | &cDoublequote | "; } window.onload = yourFunctionName(); </script>";

JavaScript:- EXAMPLE_JS

//Declare a simple JavaScript function and getElementById document property to get the HTML ID

Function HoverTextExample()

{

document.getElementById('RECNAME_FIELDNAME').title="This is Hover Text Example for the Field RECNAME.FIELDNAME";

}

window.onload=HoverTextExample();

We can also use below code using Field Class property HTMLAttribute:

Local String &Display_String=”This is Comment Displaying”;

Rec_Name.Field_Name.HTMLAttribute=””””|&Display_String|””””;

AddJavaScript(HTML.EXAMPLE_JS);


In PeopleSoft tools version 8.53 and higher we can implement deliver Mouse over Option. In HCM Employee Information and in FSCM it is Vendor Information.

Follow the below steps to have your own popup pages:-

Step 1: Create a page with the details you need to be displayed. Make sure the keys of the primary record of this page are also present in the context where you use it.

Step 2: Save the page and set the page type as Popup Page in the page properties.

Step 3: Now open your transaction page and select the field to enable popup. On the Page field properties of the selected field, go to the USE tab and Select Mouse Over Popup Option as Page Popup and provide the page name you have created in the previous step. Make sure all the keys required for the popup page is present in the context.


HCM Navigation: Main Menu -> Set Up HCM -> Common Definitions -> Mouse Over Popup -> Mouse Over Page Definition

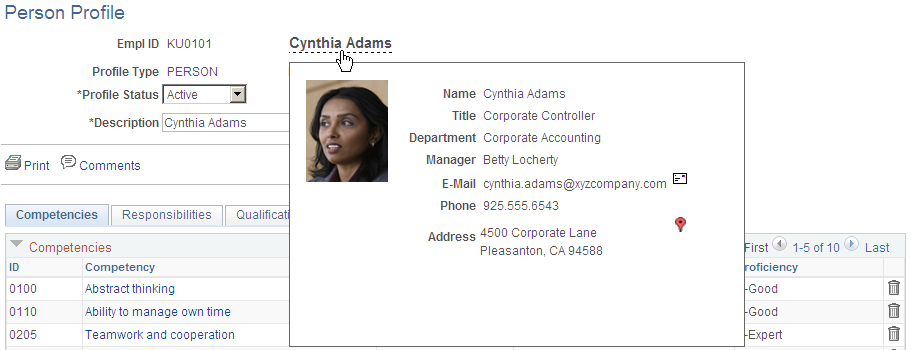
Add your Target Component Name and use any delivered sub-Page defined to display Employee/Vendor Detail Info like - Name, Title, Dept, Manager Name, Email-id, Phone Number and Address.

Add your Search Record and select the Key’s.

Example of the mouse over popup page.

Example of a mouse over popup page showing additional employee data

Details available in PeopleBook:Mouse Over Popups


Excel to Component Interface Utility

  To use the Excel to Component Interface utility, you must grant access to the iScript WEBLIB_SOAPTOCI in the permission list of the user w...