Sample App Package for BI Publisher Class in AE/PeopleCode

 * ************************ */

/* GENERATE XML & XSD FILES */

/* ************************ */


import PSXP_XMLGEN:RowSetDS;
class reportStructure
/* Constructor */
method reportStructure();
/* Generates an XSD based on a rowset */
method generateXsdFile(&aRowset As Rowset, &anXSDfile As string);
/* Generates an XML based on a rowset */
method generateXmlFile(&aRowset As Rowset, &anXMLFileName As string);
end-class;
method reportStructure
end-method;
method generateXsdFile
/+ &aRowset as Rowset, +/
/+ &anXSDfile as String +/
Local PSXP_XMLGEN:RowSetDS &rowsetDS;
Local File &fileXSD;
Local string &strSchema;
&rowsetDS = create psxp_xmlgen:RowSetDS();
&strSchema = &rowsetDS.getXSDSchema(&aRowset);
&fileXSD = GetFile(&anXSDfile, "W", %FilePath_Relative);
&fileXSD.WriteLine(&strSchema);
&fileXSD.Close();
end-method;
method generateXmlFile
/+ &aRowset as Rowset, +/
/+ &anXMLFileName as String +/
Local PSXP_XMLGEN:RowSetDS &rowsetDS;
Local File &filTmp;
Local string &strXML;
&filTmp = GetFile(&anXMLFileName, "W", "UTF-8", %FilePath_Absolute);
If &filTmp.IsOpen Then
&rowsetDS = create psxp_xmlgen:RowSetDS();
&strXML = &rowsetDS.getXMLData(&aRowset, "");
&filTmp.WriteLine(&strXML);
&filTmp.Close();
End-If;
end-method;
/* ****************** */
/* PRINT REPORT CLASS */
/* ****************** */
import PSXP_RPTDEFNMANAGER:ReportDefn;
class createReport
/* constructor */
method createReport();
/*  Rowset-based report, triggered from an Application Engine */
method buildRptFromAE(&aRptName As string, &aTmplName As string, &aFileOutput As string, &anXMLFileName As string, &anOutFormat as number);
/* Rowset-based report, triggerd from a page */
method buildRptOnLine(&aRptName As string, &aTmplName As string, &aFileOutput As string, &anXMLFileName As string, &anOutFormat as number);
end-class;
/* constructor */
method createReport
end-method;
/**************************************************************/
/* Rowset-based report, triggered from an Application Engine  */
/**************************************************************/
method buildRptFromAE
/+ &aRptName as String, +/
/+ &aTmplName as String, +/
/+ &aFileOutput as String, +/
/+ &aFileXmlName as String, +/
/+ &anOutFormat as Number +/
Local PSXP_RPTDEFNMANAGER:ReportDefn &oReportDefn;
Local date &dtAsOfDate;
Local string &strLangCD, &strOutFormat;
/* Instanciar Reporte */
&oReportDefn = create PSXP_RPTDEFNMANAGER:ReportDefn(&aRptName);
&oReportDefn.Get();
/* Idioma, fecha y formato de impresiĆ³n */
&strLangCD = %Language_User;
&dtAsOfDate = %Date;
rem &nbrOutFormat = %OutDestFormat;
&strOutFormat = &oReportDefn.GetOutDestFormatString(&anOutFormat);
&oReportDefn.UseBurstValueAsOutputFileName = True;
&oReportDefn.SetRuntimeDataXMLFile(&aFileXmlName);
rem &oReportDefn.OutDestination = &anXMLPath;
&oReportDefn.ReportFileName = &aFileOutput;
&oReportDefn.ProcessReport(&aTmplName, &strLangCD, &dtAsOfDate, &strOutFormat);
end-method;


/*********************************************/

/* Rowset-based report, triggerd from a page */

/*********************************************/

method buildRptOnLine

/+ &aRptName as String, +/

/+ &aTmplName as String, +/

/+ &aFileOutput as String, +/

/+ &aFileXmlName as String, +/

/+ &anOutFormat as Number +/


Local PSXP_RPTDEFNMANAGER:ReportDefn &oReportDefn;

Local string &strLangCD, &strOutFormat;

Local date &dtAsOfDate;


/* Instanciar Reporte */

&oReportDefn = create PSXP_RPTDEFNMANAGER:ReportDefn(&aRptName);

&oReportDefn.Get();


/* Idioma, fecha y formato de impresiĆ³n */

&strLangCD = %Language_User;

&dtAsOfDate = %Date;

&strOutFormat = &oReportDefn.GetOutDestFormatString(&anOutFormat);

&oReportDefn.UseBurstValueAsOutputFileName = True;

&oReportDefn.SetRuntimeDataXMLFile(&aFileXmlName);

rem &oReportDefn.OutDestination = &anXMLPath;

&oReportDefn.ReportFileName = &strFileOutput;

&oReportDefn.ProcessReport(&strTemplate, &strLangCD, &dtAsOfDate, &strOutFormat);

/* Publicar reporte*/

CommitWork();

/* Mostrar salida en otra ventana */

&oReportDefn.DisplayOutput();

end-method;

Generating QR Codes in PeopleSoft

 The PeopleCode language is not known for natively supporting cutting edge technical functionalities.  However, it is common for the PeopleSoft Developer to be thrown a technically advanced requirement from time to time.  When this sort of occasion arises, I like to extend PeopleCode with Java.  The possibilities are practically endless when extending PeopleCode with Java.  The problem though, is that the PeopleSoft app server may not be equipped with the proper Java packages to execute the required Java functions.  While we have the ability to deploy additional Java classes to the PeopleSoft app server, this practice is not always acceptable.  A clever alternative is to use the built-in JavaScript interpreter in Java and write JavaScript to overcome the technical hurdle.   In this post, I will demonstrate how I am able to use Java’s ScriptEngineManager class to execute JavaScript to generate QR codes in PeopleSoft.

QR codes are a great way to transport information into a mobile device that would otherwise be tedious to input manually.  QR codes have been widely adopted in the marketing space, but there are many other great use cases for QR codes.  One use case for QR codes is for transporting secret keys into mobile authenticator applications such as Google Authenticator or Authy.  Once the key information has been communicated, the mobile application can begin generating Time-Based One-Time Passwords (TOTPs) for the user.

For demonstration purposes, I created a simple IScript that is capable of returning a QR code for the logged in user.  The data inside of the QR code is a 16 character, base32 encoded string.  This string is used as the secret key for a mobile authenticator application to generate TOTPs for the user.

CLICK HERE to download the app designer project.  Unzip the project from the downloaded file and import the project from file in App Designer.  To access the QR code generating IScript, you will need to assign the PSM_QR Permission List to a Role of the users that you want to generate QR codes for.

After performing the security setup, you can login as the privileged user and invoke the IScript.  You can point your browser to the following URL to generate a QR code for the user:

<domain>/psc/ps/<portal>/<node>/s/WEBLIB_PSM_QR.ISCRIPT1.FieldFormula.IScript_GenQR

This QR code can be scanned into a mobile authenticator application and it should immediately start generating TOTPs.

QR code generation is a neat functionality, but what I really want to highlight on is how simple the application PeopleCode is behind the IScript.  I start off by generating the URL that I want to create the QR code based off of.

/* Generate random 16 character Base32 string */
Local array of string &sBase32Chars = CreateArray("A", "B", "C", "D", "E", "F", "G", "H", "I", "J", "K", "L", "M", "N", "O", "P", "Q", "R", "S", "T", "U", "V", "W", "X", "Y", "Z", "2", "3", "4", "5", "6", "7");
Local integer &i;
Local string &sKey;
For &i = 1 To 16
  &sKey = &sKey | &sBase32Chars [Int(Rand() * 32) + 1];
End-For;

/* Supply the (arbitrary) domain name for the account to be associated with */
Local string &sHost = "peoplesoftmods.com";

/* Generate the URL to be scanned into the authentication app */
Local string &sQRUrl = "otpauth://totp/" | %UserId | "@" | &sHost | "?secret=" | &sKey;

Next, I feed the generated URL into some JavaScript code that is capable of generating QR codes in SVG format.  This JavaScript code gets executed by Java’s built-in JavaScript interpreter. After the interpreter executes the script, I am able to reference the SVG image output “qrSvg” variable using the built-in get method.

/* Get the QR Code SVG JS library and the JS command to generate a QR Code from a given value */
Local string &sJSprogram = GetHTMLText(HTML.PSM_QRCODE_SVG) | GetHTMLText(HTML.PSM_QR_CODE, &sQRUrl);

/* Use the Java ScriptEngineManager to run the JavaScript program to create the QR Code */
Local JavaObject &manager = CreateJavaObject("javax.script.ScriptEngineManager");
Local JavaObject &engine = &manager.getEngineByName("JavaScript");
&engine.eval(&sJSprogram);

/* Get the outputted SVG image from the JavaScript variable */
Local string &sSVGImage = &engine.get("qrSvg").toString();

Last, I output the SVG QR code and additional details to the screen using the write method of the %Response class.

/* Output the SVG image and the account details */
%Response.Write("<br><b>Scan the QR code or enter the secret key into your authentication app</b><br>");
%Response.Write(&sSVGImage);
%Response.Write("<br>Account Name: " | %UserId | "@" | &sHost);
%Response.Write("<br>Secret Key: " | &sKey);

HTTP methods every developer should know and how to test them

Ever wondered what the difference is between GET and POST requests, or when to use PUT? You're not alone. Having a basic understanding of the different HTTP methods, or verbs, an API supports is an helpful knowledge when exploring and testing APIs.

HTTP Methods

GET

GET requests are the most common and widely used methods in APIs and websites. Simply put, the GET method is used to retreive data from a server at the specified resource. For example, say you have an API with a /users endpoint. Making a GET request to that endpoint should return a list of all available users.

Since a GET request is only requesting data and not modifying any resources, it's considered a safe and idempotent method.

Testing an API with GET requests

When you're creating tests for an API, the GET method will likely be the most frequent type of request made by consumers of the service, so it's important to check every known endpoint with a GET request.

At a basic level, these things should be validated:

  • Check that a valid GET request returns a 200 status code.
  • Ensure that a GET request to a specific resource returns the correct data. For example, GET /users returns a list of users.

GET is often the default method in HTTP clients, so creating tests for these resources should be simple with any tool you choose.

POST

In web services, POST requests are used to send data to the API server to create or update a resource. The data sent to the server is stored in the request body of the HTTP request.

The simplest example is a contact form on a website. When you fill out the inputs in a form and hit Send, that data is put in the response body of the request and sent to the server. This may be JSON, XML, or query parameters (there's plenty of other formats, but these are the most common).

It's worth noting that a POST request is non-idempotent. It mutates data on the backend server (by creating or updating a resource), as opposed to a GET request which does not change any data. Here is a great explanation of idempotentcy.

Testing an API with POST requests

The second most common HTTP method you'll encounter in your API tests is POST. As mentioned abovePOST requests are used to send data to the API server and create or update a resource. Since POST requests modify data, it's important to have API tests for all of your POST methods.

Here are some tips for testing POST requests:

  • Create a resource with a POST request and ensure a 200 status code is returned.
  • Next, make a GET request for that resource, and ensure the data was saved correctly.
  • Add tests that ensure POST requests fail with incorrect or ill-formatted data.

For some more ideas on common API testing scenarios, check out this post.

PUT

Simlar to POST, PUT requests are used to send data to the API to update or create a resource. The difference is that PUT requests are idempotent. That is, calling the same PUT request multiple times will always produce the same result. In contrast, calling a POST request repeatedly make have side effects of creating the same resource multiple times.

Generally, when a PUT request creates a resource the server will respond with a 201 (Created), and if the request modifies existing resource the server will return a 200 (OK) or 204 (No Content).

Testing an API with PUT requests

Testing an APIs PUT methods is very similar to testing POST requests. But now that we know the difference between the two (idempotency), we can create API tests to confirm this behavior.

Check for these things when testing PUT requests:

  • Repeatedly calling a PUT request always returns the same result (idempotent).
  • The proper status code is returned when creating and updating a resource (eg, 201 or 200/204).
  • After updating a resource with a PUT request, a GET request for that resource should return the correct data.
  • PUT requests should fail if invalid data is supplied in the request -- nothing should be updated.

PATCH

PATCH request is one of the lesser-known HTTP methods, but I'm including it this high in the list since it is similar to POST and PUT. The difference with PATCH is that you only apply partial modifications to the resource.

The difference between PATCH and PUT, is that a PATCH request is non-idempotent (like a POST request).

To expand on partial modification, say you're API has a /users/{{userid}} endpoint, and a user has a username. With a PATCH request, you may only need to send the updated username in the request body - as opposed to POST and PUT which require the full user entity.

Testing an API with PATCH requests

Since the PATCH method is so simlar to POST and PUT, many of the same testing techniques apply. It's still important to validate the behavior of any API endpoints that accept this method.

What to look for when testing PATCH requests:

  • A successful PATCH request should return a 2xx status code.
  • PATCH requests should fail if invalid data is supplied in the request -- nothing should be updated.

The semantics of PATCH requests will largely depend on the specific API you're testing.

DELETE

The DELETE method is exactly as it sounds: delete the resource at the specified URL. This method is one of the more common in RESTful APIs so it's good to know how it works.

If a new user is created with a POST request to /users, and it can be retrieved with a GET request to /users/{{userid}}, then making a DELETE request to /users/{{userid}} will completely remove that user.

Testing an API with DELETE requests

DELETE requests should be heavily tested since they generally remove data from a database. Be careful when testing DELETE methods, make sure you're using the correct credentials and not testing with real user data.

typical test case for a DELETE request would look like this:

  1. Create a new user with a POST request to /users
  2. With the user id returned from the POST, make a DELETE request to /users/{{userid}}
  3. A subsequent GET request to /users/{{userid}} should return a 404 not found status code.

In addition, sending a DELETE request to an unknown resource should return a non-200 status code.

The HEAD method is almost identical to GETexcept without the response body. In other words, if GET /users returns a list of users, then HEAD /users will make the same request but won't get back the list of users.

HEAD requests are useful for checking what a GET request will return before actually making a GET request -- like before downloading a large file or response body. Learn more about HEAD requests on MDN.

It's worth pointing out that not every endpoint that supports GET will support HEAD - it completely depends on the API you're testing.

Testing an API with HEAD requests

Making API requests with HEAD methods is actually an effective way of simply verifying that a resource is available. It is good practice to have a test for HEAD requests everywhere you have a test for GET requests (as long as the API supports it).

Check these things when testing an API with HEAD requests:

  • Verify and check HTTP headers returned from a HEAD request
  • Make assertions against the status code of HEAD requests
  • Test requests with various query parametesr to ensure the API responds

Another useful case for HEAD requests is API smoke testing - make a HEAD request against every API endpoint to ensure they're available.

OPTIONS

Last but not least we have OPTIONS requests. OPTIONS requests are one of my favorites, though not as widely used as the other HTTP methods. In a nutshell, an OPTIONS request should return data describing what other methods and operations the server supports at the given URL.

OPTIONS requests are more loosely defined and used than the others, making them a good candidate to test for fatal API errors. If an API isn't expecting an OPTIONS request, it's good to put a test case in place that verifies failing behavior.

Testing an API with OPTIONS requests

Testing an OPTIONS request is dependent on the web service; whether or not it supports that and what is supposed to return will define how you should test it.

How to validate an endpoint using OPTIONS:

  • Primarily, check the response headers and status code of the request
  • Test endpoints that don't support OPTIONS, and ensure they fail appropriately

More resources

What I've discussed above is just a starting point for digging in to HTTP methods and testing various resources of an API. It also assumes a mostly ideal case - in the real world, APIs are not as structured as the examples above. This makes testing various methods against an API an effective way to find unexpected bugs.

Displaying image / picture dynamically in XML Publisher (BI Tools) RTF template

Below two examples will demonstrate displaying image dynamically in XML publisher in Microsoft Office 2007 and onwards version.

Displaying Company logo image dynamically in XML Publisher (BI Tools) in RTF Template :

  1. Insert any dummy placeholder image in RTF template (Insert a Picture)
  2. Right click on image and click “Size” then goto “AltText” tab and enter dynamic path in “Alternative Text” field  e.g. url:{concat(‘${OA_MEDIA}’,’/XX_Logo.jpg’)}.
$OA_MEDIA path TOP is actual path in Oracle App instance where images are stored . DBA may help to get $OA_MEDIA Top path to upload XX_Logo.jpg file.

Displaying signature dynamically in XML Publisher (BI tools) RTF template

  1. Insert any dummy placeholder image in RTF template (Insert  a Picture)
  2. Right click on image and click “Size” then goto “AltText” tab and enter dynamic path in “Alternative Text” field  e.g. url:{concat(‘${OA_MEDIA}/XX_buyer_’,/PO_DATA/DOCUMENT_BUYER_FIRST_NAME ,’_’,/PO_DATA/DOCUMENT_BUYER_LAST_NAME ,’.jpg’)}
$OA_MEDIA path TOP is actual path in Oracle App instance where images are stored. DBA may help to get $OA_MEDIA Top path to upload buyer’s signature file. Below examples will demonstrate displaying image dynamically in XML publisher in Microsoft Office 2003 which obsolete in MS office 2007 and onward versions.

PeopleSoft password encryption and decryption


pscipher, psvault and Web Server Passwords

Encrypting passwords is a common activity for PeopleSoft administrators. For many of us, we take for granted that passwords are encrypted by the system. In this post, I want to look at password encryption for web server configuration files and how that works.

Encrypting with pscipher

pscipher is a PeopleTools utility that encrypts passwords using 3DES encryption. The utility is a wrapper for a Java class that handles the encryption and decryption of passwords. If you look at the passwords stored in the configuration.properties file, or produced by pscipher, they look something like this: {V1.1}IsZtCVg15Ls=

To encrypt a password with pscipher:

  1. Navigate to your web server’s [PS_CFG_HOME]\webserver\[domain]\piabin folder.
  2. Run .\pscipher.bat [password]

pscipher will return the encrypted output:

.\PSCipher.bat password

Your environment has been set.
Encrypted text: {V1.1}7m4OtVwXFNyLc1j6pZG69Q==

You can copy/paste the encrypted text into your web server config files. For example, below is the pskey configuration in the integrationGateway.properties file using an encrypted password:

secureFileKeystorePath=e:/psft/cfg/LM014-8.55.09/webserv/peoplesoft1/piaconfig/keystore/pskey
secureFileKeystorePasswd={V1.1}7m4OtVwXFNyLc1j6pZG69Q==

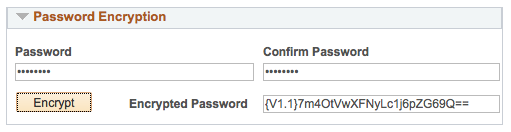
You can also encrypt passwords with pscipher through the PIA too. Navigate to PeopleTools > IB > Configuration > Gateways. Select your a gateway and click “Gateway Setup Properties”. After you log into the gateway, select the link “Advanced Properties Page”. This page lets you modify the integrationGateway.properties file directly, but it also has a Password Encryption section. This Password Encryption tool calls pscipher on your application server to encrypt passwords.

encryptPasswordPIA

Building New Keys

The {V1.1} at the beginning of the password denotes which key pscipher uses. 1.1 means your passwords are using the default key. To create a new key, run the command pscipher -buildkey. A new key will be appended to the file psvault. The pscipher command will now generate {V1.2} passwords. Appended is important here. This means that you can still use {V1.1} encrypted passwords in your configuration files and the newer {V1.2} encrypted passwords.

psvault Locations

The psvault file is stored under [PS_CFG_HOME]\webserv\[domain]\piaconfig\properties\psvault. When you run -buildkey, that is the file pscipher updates. After you update the key to {V1.2}, you need to copy the updated psvault file to any other web and app servers that you want to decrypt the new passwords.

  • For web servers, copy the updated psvault file to [PS_CFG_HOME\webserv\[domain]\piaconfig\properties\psvault.
  • For app servers, copy file to [PS_HOME]\secvault\psvault.

You should copy the updated psvault file to your app servers. When you update your integrationGateway.properties file online (PeopleTools > IB > Configuration > Gateways), any passwords you encrypt using the online pages are encrypted with the app server’s copy of psvault.

So far, I haven’t been able to get the Tuxedo domains to recognize the psvault file under PS_CFG_HOME, and a Oracle confirmed with me that PS_CFG_HOME is not supported with psvault and the app server. If you are using decoupled homes, this breaks some of the benefits of having a separate and shared PS_HOME codeline. I created an Idea on the Oracle Community site to add support for PS_CFG_HOME and psvault.

PeopleSoft passwords

We can divide these passwords mainly into 2 groups:
1) passwords generated by the PSCipher utility
2) passwords that we can discover in psappsrv.cfg file

Passwords produced by the PSCipher utility

According to Oracle, “The PSCipher feature encrypts and decrypts text used in your PeopleSoft system. System administrators interact with PSCipher through a Java, command line utility located on the web server, which enables you to encrypt text, such as user IDs and passwords, stored in configuration files.

We can use this utility for encryption, but if we run it, we won’t find any arguments for password decryption.

Java application is a utility by itself, so we can try decompiling it and find out how we can use it for password decryption.

For decompilation, I applied Procyon utility. After, we can see that the PSCipher utility is a simple program that has several methods and one of them is provided below.

Nevertheless, we don’t have access to this method from the program start point, a main function. Therefore, we can a little bit change the main function to use this method.

If we append this code and recompile the PSCipher utility, we will be able to decrypt PSCipher’s passwords.

The PSCipher utility uses triple DES algorithm to encrypt/decrypt user passwords. The secret key is stored in special storage that is called psvalut. You can also mention a prefix that is used in a password encrypted by the PSCipher. In our case, it is {V1.1}. These prefixes indicate that the version of psvault format is “V1”, the second part after the dot is the number of internal triple DES key for passwords decryption/encryption. For example, if we run the PSCipher with an option -BuildKey we will get a message:

If we run the utility again with the same option, we get {V1.3}, etc.

User data is encrypted on a new secret key, it is added to psvault, and older keys are not lost, and you can decrypt the old data with prefixes 1.1, 1.2.

It’s important for PeopleSoft administrators to understand that if they don’t add a new secret key to psvalut storage (- BuldKey option) after system installation, PeopleSoft system will use default 3DES secret key for all data that needs to be encrypted. A default key in psvault isn’t generated randomly after installation, and the prefix {1.1} indicates that the PeopleSoft system uses this default base64 encoded triple DES key.

We can easily check that our psvault storage contains this key using STRINGS, SED, and CUT commands on Unix-like operation systems.

In the output that is shown above, the first line is a default key for {V1.1} prefix, and the remaining keys generated randomly are used for prefixes {V1.2} and {V1.3} accordingly.

The predefined key for the prefix {V1.1} was used on the whole PeopleSoft installation with a PeopleTools version at least from 8.50 and further. It means if an attacker somehow exposed critical data from PeopleSoft inner configs, he or she can easily decrypt and obtain the original password. This decrypted password can be used to leverage an attacker’s access to critical parts of PeopleSoft system or even can compromise the system, in case an attacker got access to integrationGateway.properties config.

Another way of collecting passwords that have been encrypted with the default key is to use Google. As a rule, PeopleSoft administrators expose passwords by themselves. For example, we can find that these passwords are publicly accessible:

Passwords from psappsrv.cfg

This file contains critical credentials such as password from PS user, PeopleSoft Application Administrator.

If we try to find any information on how these passwords can be encrypted we will get stuck, at least the same happened to me.

I am only aware that PSADMIN utility can change passwords in psappsrv.cfg but how exactly, I don’t know.

PSADMIN utility is well known in PeopleSoft administrators, it is used to manage PeopleSoft systems.

We can change passwords manually in the menu that was shown above. Now we should understand how passwords are stored. We should answer 2 questions for that:

  • Are they encrypted or hashed?
  • Can we decrypt them if they are encrypted?

Finally, PSADMIN utility changes data in psappsrv.cfg configuration file, so if we look at passwords in this file we will see the following:

At first glance, the passwords are hashed. Nevertheless, we can get all answers from the PSADMIN utility. For that, we will try collecting base information about the internal functionality of the utility. For that, we try to get names of all symbols used in the PSADMIN utility. We can do this with an assist of nm utility.

The nm utility was used because Oracle doesn’t delete symbols from the PSADMIN tool.

We can try to find curious function names that work with passwords. We can do this in the following way:

It seems interesting because according to the function name, RetrieveDomainConnectionPwd, we can in theory retrieve passwords from psappsrv.cfg.

RetrieveDomainConnectionPwd

Now it is time for static analysis. We can try to grasp how this function works by using IDA Pro disassembler or another free analog, for example, radare2. After the function has been decompiled and slightly reverse-engineered, we can see these remarkable parts of it:

and

It means that some utility is called with an option “-decr”, and it seems that its name is UBBGEN. Fast check in dynamic analyses has shown that it’s true. If we stop execution in _popen function and look at content of command variable, we will see the following:

popen_UBBGEN

The UBBGEN utility can read parameters from a file, there is a file content

Therefore, finally, this is how we can run command to decrypt DomainConnectionPwd:

Moreover, if we remove ’30’ program, it will work correctly.

The UBBGEN utility can decrypt more than one parameter from psappsrv.cfg (DomainConectionPwd), and even all of them.

In my test system, they look as follows:

Another compelling thing about UBBGEN that it has “-encr” option and we can encrypt what we need.

The UBBGEN utility

According to it, “Regardless of how you specify domain values, ultimately you must run PSADMIN to generate some necessary files that include your specific values. In the following example, PSADMIN invokes another PeopleSoft executable, UBBGEN, which reads the values and format in the psappsrv.cfg, psappsrv.val, and psappsrv.ubx files, and generates the psappsrv.ubb and psappsrv.env files.

Where you see Do you want to change any config values? (y/n), regardless of what you enter, PSADMIN calls UBBGEN.

If you have already entered values manually in the psappsrv.cfg file and enter n, UBBGEN reads those values and writes to the necessary files.

If you enter y, you see the PSADMIN prompt interface, which is actually a wrapper to UBBGEN. UBBGEN reads the previous values in the psappsrv.cfg, presents those values, and allows you to change them. It presents the values in the format that is derived from reading the PSAPPSRV.UBX file, and it validates selected values based on criteria in the PSAPPSRV.VAL file.

It implies that PSADMIN is only a wrapper for UBBGEN that does all main work behind the scene. If we run UBBGEN without any arguments, we will get its usage prompt.

It’s ironic that UBBGEN’s usage prompt doesn’t show “-decr” and “-encr” options, it seems they are hidden.

Since PeopleSoft delivers the base64 encryption algorithm with the PSPETSSL encryption library, we can move right into defining the Algorithm Chain. To define the chain, navigate to PeopleTools > Security > Encryption > Algorithm Chain. Add the new value BASE64_ENCODE and add the following Algorithms in order:

  1. PSUnicodeToAscii
  2. base64_encode
  3. PSAsciiToUnicode

Be sure to set the sequence number for each row (1-3). Save and navigate to PeopleTools > Security > Encryption > Encryption Profile. Add the new value BASE64_ENCODE. Specify the algorithm chain BASE64_ENCODE and save. We can now test this pluggable encryption profile with a little PeopleCode:

Local object &crypto = CreateObject("Crypt");
&crypto.Open("BASE64_ENCODE");
&crypto.UpdateData("Hello World");
MessageBox(0, "", 0, 0, "Encrypted: " | &crypto.Result);

And, the result should be: SGVsbG8gV29ybGQ=. I am sure you will all agree that this solution is much simpler than the ugly Java Reflection I previously demonstrated. Furthermore, this method is well documented in PeopleBooks and supported by PeopleSoft.

The UBBGEN decryption algoritm

PeopleCode to retrieve Google map between two addresses

  PeopleCode Example: /* Define constants for the API request */ Local string &origin = "123 Main St, Anytown, USA";   /* ...