Declare the version of the Google Pay API that your site uses. The major and minor versions are required in the fields of each passed object, and are included in the response.
The following code sample shows declared API versions:
Replace example and exampleGatewayMerchantId with the appropriate values for your payment provider. Use the following table to find the specific gateway and gatewayMerchantId values for your payment provider:
The PAYMENT_GATEWAY tokenization type is the most common merchant implementation of the card payment method in the Google Pay API. If your payment provider isn't supported, you might be able to accept Google Pay by a DIRECT integration. For more information, see the Direct tokenization documentation.
Step 3: Define supported payment card networks
Define the card networks accepted by your site. See the following code sample:
The Google Pay API might return cards on file with Google (PAN_ONLY), and/or a device token on an Android device that's authenticated with a 3-D Secure cryptogram (CRYPTOGRAM_3DS). See the following code sample:
For more information, see CardParameters in our Object reference documentation. Also, check with your gateway or processor for the card networks that are supported, and for support for Android device tokens.
Step 4: Describe your allowed payment methods
To describe your allowed payment methods, complete the following steps:
Combine your supported authentication methods and supported card networks in order to describe your site's support for the CARD payment method. See the following code sample:
Extend the base card payment method object to describe information you expect to be returned to your application. Include a description of the tokenized payment data. See the following code sample:
After the Google Pay API JavaScript library loads, initialize a PaymentsClient object. Initial development uses a TEST environment, which returns dummy payment methods that are suitable to reference the structure of a payment response. In this environment, a selected payment method isn't capable of a transaction. See the following code sample.
const paymentsClient = new google.payments.api.PaymentsClient({environment:'TEST'});
For more information about the requirements for a PRODUCTION environment that returns chargeable payment methods, see the Integration checklist.
Step 6: Determine readiness to pay with the Google Pay API
To determine readiness to pay with the Google Pay API, complete the following steps:
Add your allowed payment methods to your base request object. See the following code sample:
Call isReadyToPay() to determine if the Google Pay API is supported by the current device and browser for your specified payment methods. See the following code sample:
paymentsClient.isReadyToPay(isReadyToPayRequest) .then(function(response){ if(response.result){ // add a Google Pay payment button } }) .catch(function(err){ // show error in developer console for debugging console.error(err); });
Step 7: Add a Google Pay payment button
Add a Google Pay payment button to your page to encourage shoppers to check out with payment methods that are supported by the Google Pay API and your site. For more information about available button types, colors, and display requirements, see the Brand guidelines.
See the following payment button code sample:
const button = paymentsClient.createButton({onClick:()=> console.log('TODO: click handler'), allowedPaymentMethods:[]});// make sure to provide an allowed payment method document.getElementById('container').appendChild(button);
Step 8: Create a PaymentDataRequest object
To create a PaymentDataRequest object, complete the following steps:
Build a JavaScript object that describes your site's support for the Google Pay API. For a full list of supported properties, see PaymentDataRequest. See the following code sample:
Add the payment methods supported by your app, such as any configuration of additional data that's expected in the response. See the following code sample:
Provide a user-visible merchant name, and use our TESTmerchantId value when in TEST. For more details, and for information on when to replace the TESTmerchantId value, see MerchantInfo. See the following code sample of a user-visible merchant name:
Step 9: Register an event handler for user gestures
To register an event handler for user gestures, complete the following steps:
Register a click event handler for the purchase button. The event handler calls loadPaymentData() immediately after it interacts with the Google Pay, payment button.
After a Google user grants permission for your site to receive information about the user's selected form of payment and optional contact data, handle the response from the Google Pay API.
Extract the payment token from the paymentData response. If you implement a gateway integration, pass this token to your gateway without any modifications.
paymentsClient.loadPaymentData(paymentDataRequest).then(function(paymentData){ // if using gateway tokenization, pass this token without modification paymentToken = paymentData.paymentMethodData.tokenizationData.token; }).catch(function(err){ // show error in developer console for debugging console.error(err); });
Step 10 (optional): Prefetch payment data before user interaction
To improve execution time, prefetch your website's payment configuration from the Google Pay API before you call loadPaymentData(). See the following example:
Authorize Payments is used to start the payment process and acknowledge a payment's authorization status. To set up Authorize Payments, take the following steps:
The onPaymentAuthorized() callback is invoked with a PaymentData object by Google after a payer approves payment through a user gesture, such as if they click Pay.
The callback returns a Promise<PaymentAuthorizationResult> value. The PaymentAuthorizationResult object has a SUCCESS or ERROR transaction state status. Upon success, the payment sheet is closed successfully. If you encounter an error, the payment sheet renders the error details returned after the payment is processed. The user can change the payment sheet’s payment data and authorize the payment again. See the following code sample:
Step 12 (optional for shipping-enabled): Set up Dynamic Price Updates
Dynamic Price Updates allows a merchant to dynamically update shipping options and transaction information based on a chosen shipping address. Additionally, you can dynamically update transaction information based on a chosen shipping option.
To set up Dynamic Price Updates, take the following steps:
The callback returns a Promise<PaymentDataRequestUpdate>. The PaymentDataRequestUpdate object has new transaction information, shipping options, and a payment data error. This data updates the payment sheet.
Handle any exception cases, such as an unserviceable shipping address or invalid shipping option, directly in the payment sheet. Set up a PaymentDataError object to highlight the reason for the error with an error message to the user. Be sure to include the related intent in the message. For details on how to set up the object and message, see the following code sample:
function onPaymentDataChanged(intermediatePaymentData){ returnnewPromise(function(resolve, reject){
let shippingAddress = intermediatePaymentData.shippingAddress; let shippingOptionData = intermediatePaymentData.shippingOptionData; let paymentDataRequestUpdate ={};
The callback must return a Promise<PaymentDataRequestUpdate>. The PaymentDataRequestUpdate object has new transaction information, shipping options, offer data, and a payment data error. This data updates the payment sheet.
Handle any exception cases, such as an invalid promo code, directly in the payment sheet. Set up a PaymentDataError object to highlight the reason for the error with an error message to the user. Be sure to include the related intent in the message. For details on how to set up the object and message, see the following code sample, which references an object (validPromoCodes) containing the promo code values:
function onPaymentDataChanged(intermediatePaymentData){ returnnewPromise(function(resolve, reject){
let redemptionCodes =[]; let shippingOptionData = intermediatePaymentData.shippingOptionData; let paymentDataRequestUpdate ={}; paymentDataRequestUpdate.newTransactionInfo = getGoogleTransactionInfo();
// ensure that promo codes set is unique if(typeof intermediatePaymentData.offerData !='undefined'){ // convert to set then back to array redemptionCodes =Array.from( newSet(intermediatePaymentData.offerData.redemptionCodes) ); }
// OPTIONAL: ensure that the newest promo code is the only one applied // redemptionCodes = new Array(redemptionCodes[redemptionCodes.length -1]);
The example code blocks in this section show a complete end-to-end example of the Google Pay API JavaScript library tutorial, Authorize Payments, Dynamic Price Updates, and Promo Codes.
Here we will be creating a GET
request REST service which will be world accessible.
Before proceeding we need to take care that the
minimum tools version required is 8.53.
Brief steps:
1. Create a document
for input GET parameters.
2. Create message for
input document for GET parameters.
3. Create an output
XML.
4. Create a new
message for output XML.
5. Create a new REST
Service.
6. Create a new GET
Service Operation.
7. Create a new
Application Package that needs to be used as a Service Operation Handler.
8. Assign the Handler.
9. Enable Anynomous
Node.
10. Test the Operation
from outside PeopleSoft.
Step 1:
Navigation:
Main
Menu->PeopleTools->Documents->Document Builder
Click on “Add a New Value” link here.
Now fill “Package”, “Document” and “Version” and click “Add”.
On Next Page, click on the root of the document and click on the “Add Primitive Child” button below (Purple one). And add the details as in the screenshot. And click “Save”.
Step 2:
Navigation:
Main Menu->PeopleTools->Integration Broker->Integration Setup->Messages
Click on “Add a New Value” link here.
Now fill details as in screenshot and click “Add” and then click “Save”.
<?xml version="1.0" encoding="UTF-8"?>
<xs:schema xmlns:xs="http://www.w3.org/2001/XMLSchema" elementFormDefault="qualified" attributeFormDefault="unqualified">
<!-- XML Schema Generated from XML Document on Fri May 12 2017 18:38:05 GMT+0530 (India Standard Time) -->
<!-- with XmlGrid.net Free Online Service http://xmlgrid.net -->
<xs:element name="REST_TEST_OUTPUT">
<xs:complexType>
<xs:sequence>
<xs:element name="msgdata" type="xs:string"></xs:element>
</xs:sequence>
</xs:complexType>
</xs:element>
</xs:schema>
Use this example XML.
Schhema created from:
http://xmlgrid.net/xml2xsd.html
Step 4:
Navigation:
Main Menu->PeopleTools->Integration Broker->Integration Setup->Messages
Click on “Add a New Value” link here.
Now fill “Type”, “Message Name” and “Message Version” and click “Add”.
Fill out the details in “Message Definition” tab as in screenshot below.
Now in schema tab click on “Add Schema”, paste the above schema and click on “OK”.
Now get back to “Message Definition” tab and click “Save”.
Step 5:
Navigation:
Main Menu->PeopleTools->Integration Broker->Integration Setup->Services
Click on “Add a New Value” link here.
Now fill “Service” and check “REST Service” checkbox and click “Add”.
Fill the details as below and click on “Save”. Don’t go of te page yet.
Step 6:
Navigation:
Main Menu->PeopleTools->Integration Broker->Integration Setup->Service Operations
Before going to the navigation above we need to create the REST Service Operation of GET type on the Service page only. Fill the details as in screenshot and click “Add”.
Now it will take you to the Service Operation page. Fill the details as in the screenshots below and click on “Save”.
Now Click on “Service Operation Security” and add the permission list with “Full Access”. I have used “PTPT1000” permission list and will assign “PeopleSoft User” role to user assigned to ANONYMOUS node. And click “Save”.
Step 7:
Now we have to open Application Designer. Create a new Application Package with the code below.
import PS_PT:Integration:IRequestHandler;
class Process implements PS_PT:Integration:IRequestHandler
method Process();
method OnRequest(&_MSG As Message) Returns Message;
method OnError(&pRequestMsg As Message) Returns string;
end-class;
method Process
end-method;

method OnRequest
/+ &_MSG as Message +/
/+ Returns Message +/
/+ Extends/implements PS_PT:Integration:IRequestHandler.OnRequest +/

Local Message &request, &response;

&request = &_MSG;

Local Document &reqDOC;

&reqDOC = &request.GetURIDocument();

Local string &name;
Local integer &count;

&name = &reqDOC.GetElement("name").value;

&response = CreateMessage(Operation.REST_TEST_SOP_GET, %IntBroker_Response);

Local XmlDoc &xmlout;

&xmlout = CreateXmlDoc("<?xml version=""1.0""?><REST_TEST_OUTPUT><msgdata>Hello " | &name | "</msgdata></REST_TEST_OUTPUT>");

&response.SetXmlDoc(&xmlout);

Return &response;

end-method;

method OnError
/+ &pRequestMsg as Message +/
/+ Returns String +/
/+ Extends/implements PS_PT:Integration:IRequestHandler.OnError +/

Return "Error Occured";
end-method;
Step 8:
Navigation:
Main Menu->PeopleTools->Integration Broker->Integration Setup->Service Operations
Open the “Service Operation”, open the “Handlers” tab. put the “Name”, “Type” and “Implementation” as below screenshot. And click on “Details” link.
Put the Handler details as below screenshot. Click “OK” then “Save”.
Step 9:
Navigation:
Main Menu->PeopleTools->Integration Broker->Integration Setup->Nodes
To enable ANONYMOUS Node open it and check the PeopleSoft user assigned to it.
Now Provide the appropriate role to the user which contains permission list which was assigned full access in “Step 6”.
Step 10:
Get the URL from Service Operation page. In my case URL is:
Oracle Database Service for Microsoft Azureis an Oracle Cloud Infrastructure (OCI) service that delivers Oracle cloud databases directly to Microsoft Azure customers through theOracle Interconnect for Azure(this capability is available between the two cloud environments in 11 regions around the world).Oracle Database Service for Microsoft Azure enables Azure administrators and developers to seamlessly connect their Azure applications to multiple OCI database services. You can build new applications that combine the full Azure catalog of AI, analytics, and Windows compute services with Oracle Database Services. This access is made possible through a guided process that securely connects Microsoft Azure and OCI accounts and a user interface for Azure professionals to deploy and manage OCI Database services.
Architecture
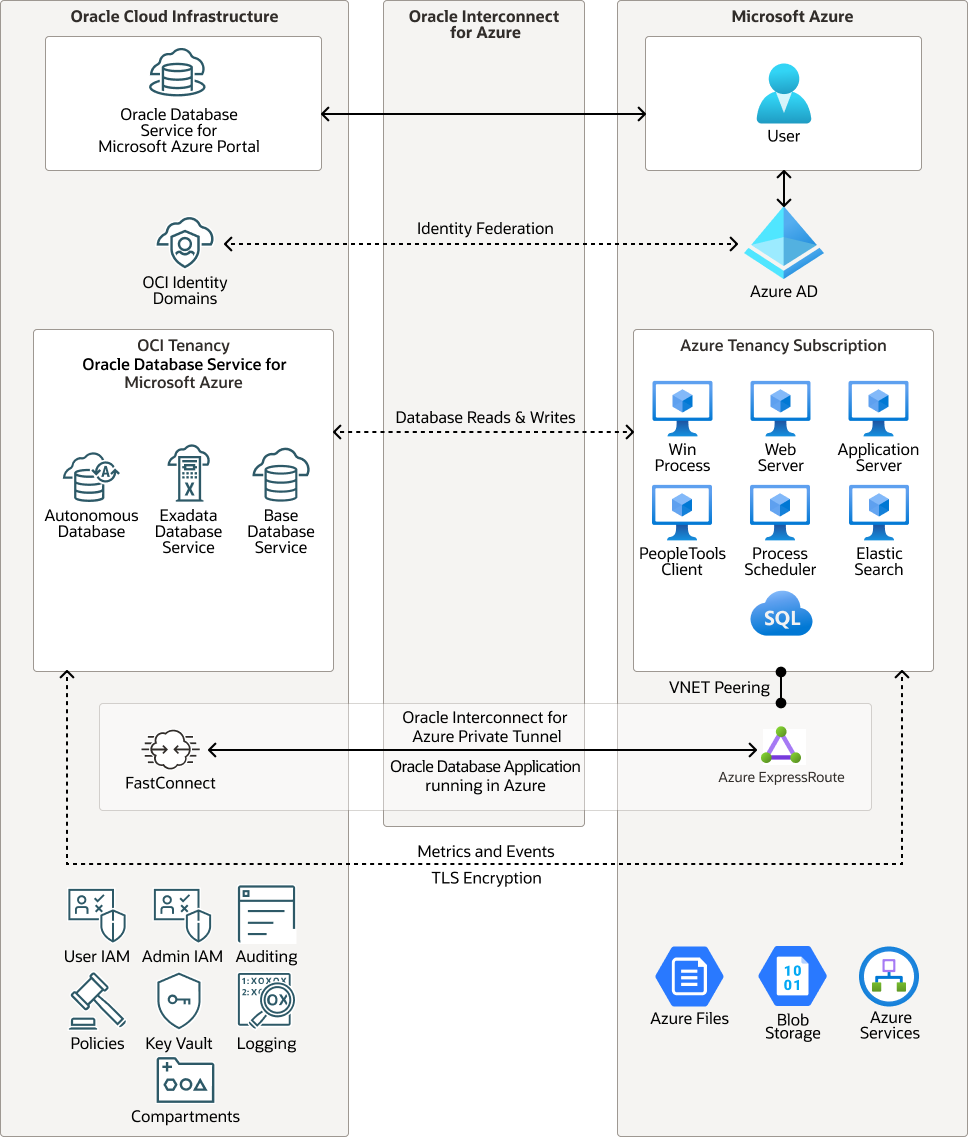
This architecture shows how to securely connect Microsoft Azure and Oracle Cloud Infrastructure (OCI) accounts. A user interface for Azure professionals enables you to deploy and manage OCI database services.
Oracle Database Service for Microsoft Azure supports the following Oracle Cloud database service offerings:
Oracle Autonomous Database Shared
Oracle Exadata Database Service
Oracle Base Database
The following diagram illustrates this reference architecture implementation of PeopleSoft with Oracle Database Service for Microsoft Azure and Microsoft Azure compute. In this architecture Oracle Database Service for Microsoft Azure wires together components in Microsoft Azure and OCI tenants.
To use Oracle Database Service for Microsoft Azure, an Azure Administrator must first onboard an Microsoft Azure environment and Oracle Database Service for Microsoft Azure. The onboarding process includes the following:
Account linking
Creates the configuration that connects an Azure tenancy to an OCI tenancy; this is a required step and must be completed before an authorized user can access the Oracle Database Service for Microsoft Azure Portal.
Subscription linking
Links one or more Azure subscriptions to Oracle Database Service for Microsoft Azure to manage the billing.
Identity federation (optional)
Enables Azure users to log into Oracle Database Service for Microsoft Azure using their Azure credentials. With identity federation, Oracle Database Service for Microsoft Azure streams much of the day-to-day operational data from Oracle Database Service for Microsoft Azure managed Oracle databases to Azure Application Insights and Azure Log Analytics.
After onboarding is completed, the administrator and database administrators or developers use the Oracle Database Service for Microsoft Azure Portal to deploy and provision Oracle database products for use in the onboarded Azure environment.
For each database service, Oracle Database Service for Microsoft Azure supports the common administration and application access capabilities:
Create, read, update, delete, list (CRUDL)
Clone database
Database backup (automatic and manual)
Database restore (restore to existing database for now)
Generate Azure connection string
Display database metrics
The architecture has the following components:
Tenancy
A tenancy is a secure and isolated partition that Oracle sets up within Oracle Cloud when you sign up for Oracle Cloud Infrastructure. You can create, organize, and administer your resources in Oracle Cloud within your tenancy. A tenancy is synonymous with a company or organization. Usually, a company will have a single tenancy and reflect its organizational structure within that tenancy. A single tenancy is usually associated with a single subscription, and a single subscription usually only has one tenancy.
Compartment
Compartments are cross-region logical partitions within an Oracle Cloud Infrastructure tenancy. Use compartments to organize your resources in Oracle Cloud, control access to the resources, and set usage quotas. To control access to the resources in a given compartment, you define policies that specify who can access the resources and what actions they can perform.
FastConnect
Oracle Cloud Infrastructure FastConnect provides an easy way to create a dedicated, private connection between your data center and Oracle Cloud Infrastructure. FastConnect provides higher-bandwidth options and a more reliable networking experience when compared with internet-based connections.
Oracle Base Database Service
Oracle Base Database Service is a fully managed database service that lets developers quickly develop and deploy secure, cloud native applications. Oracle automates all tasks, such as backup and recovery, database and operating system patching, updates, and data encryption.
Autonomous Database
Oracle Cloud Infrastructure Autonomous Database is a fully managed, preconfigured database environments that you can use for transaction processing and data warehousing workloads. You do not need to configure or manage any hardware, or install any software. Oracle Cloud Infrastructure handles creating the database, as well as backing up, patching, upgrading, and tuning the database.
Autonomous Data Warehouse
Oracle Autonomous Data Warehouse is a self-driving, self-securing, self-repairing database service that is optimized for data warehousing workloads. You do not need to configure or manage any hardware, or install any software. Oracle Cloud Infrastructure handles creating the database, as well as backing up, patching, upgrading, and tuning the database.
Autonomous Transaction Processing
Oracle Autonomous Transaction Processing is a self-driving, self-securing, self-repairing database service that is optimized for transaction processing workloads. You do not need to configure or manage any hardware, or install any software. Oracle Cloud Infrastructure handles creating the database, as well as backing up, patching, upgrading, and tuning the database.
Exadata Database Service
Oracle Exadata Database Service enables you to leverage the power of Exadata in the cloud. You can provision flexible X8M systems that allow you to add database compute servers and storage servers to your system as your needs grow. X8M systems offer RoCE (RDMA over Converged Ethernet) networking for high bandwidth and low latency, persistent memory (PMEM) modules, and intelligent Exadata software. You can provision X8M systems by using a shape that's equivalent to a quarter-rack X8 system, and then add database and storage servers at any time after provisioning.
Oracle Interconnect for Azure
Oracle Interconnect for Azure is Oracle’s first multicloud offering. It delivers a direct network connection between specific Azure and Oracle Cloud Infrastructure (OCI) data centers around the world. It enables Azure administrators and developers to connect their applications to applications and services running in OCI without creating dedicated links or sending their application traffic across the public internet.
Considerations
Consider the following points when deploying this reference architecture.
Identity Federation
Microsoft Azure users log into Oracle Database Service for Microsoft Azure using their Azure credentials. An Azure user must have Oracle Cloud Infrastructure (OCI) credentials to work in the OCI Console. For example, users must use the OCI Console to perform tasks not currently enabled through Oracle Database Service for Microsoft Azure. Oracle recommends that organizations federate their Azure user identities to OCI. With this in place, authorized users log in to Azure, Oracle Database Service for Microsoft Azure, and OCI using a single set of credentials – their existing Azure credentials.
Support
Oracle Database Service for Microsoft Azure is jointly supported by Oracle and Microsoft through our existing partnership and Microsoft and Oracle Interconnect for Azure. Customers encountering an issue in Oracle Database Service for Microsoft Azure create an OCI Service Request directly from within the Oracle Database Service for Microsoft Azure Portal. OCI Support engineers work the issue and, when necessary, engage Microsoft Azure support to resolve the issue.
Billing
OCI bills customers directly for Oracle Database Service for Microsoft Azure-provisioned resources. From the Oracle Database Service for Microsoft Azure Portal, authorized users can link directly to the OCI billing page to view details about their service use.