Fluid Forms and Approval Builder is a handy utility that provides an alternative to paper based processes in a organization. It’s key features are the out-of-the-box integration with,
- File Attachments
- Approval Workflow Engine
- Component Interface Mapping
It is ideally suitable for building simple forms, collecting file attachments from users, invoking workflow approval process involving multiple users and finally updating a transaction component using component interface.
However a common feedback among customers is that this utility is too simple and not effective to build user friendly forms for real-world use-cases. Key limitations of this utility are,
- Inability to default or load contextual data to the form
- Inability to validate data entered by user
- Lack of support for multiple levels of data (table structures)
While this utility is not intended to build complex pages like application designer, basic features like field defaults and validations are essential to build user-friendly forms.
Thanks to the ever so powerful PeopleCode Event Mapping feature. We can now effectively introduce custom business rules and validations to the forms built using Forms and Approval builder.
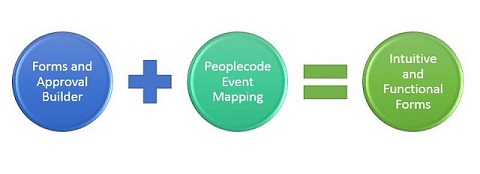
I have illustrated this capability using a simple form created for employees to claim expenses.
- A fluid form is created using Forms and Approval builder, making use of the delivered attachment and workflow approval capability
- PeopleCode Event Mapping Framework is used to
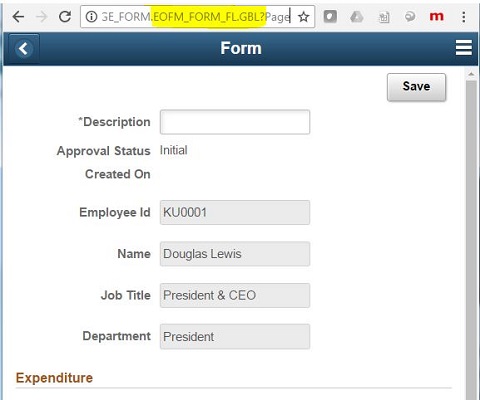
- Pre-Populate form with employee related information
- Validate data entered by user when the form is saved, allowing the user to resolve any validation error
Designing and deploying a form using Forms and Approval builder is entirely an online configuration activity, using PeopleCode event mapping framework to build and add business rules to the forms is a technical activity.
Explained below is the summary of steps to build a form as shown in the video.
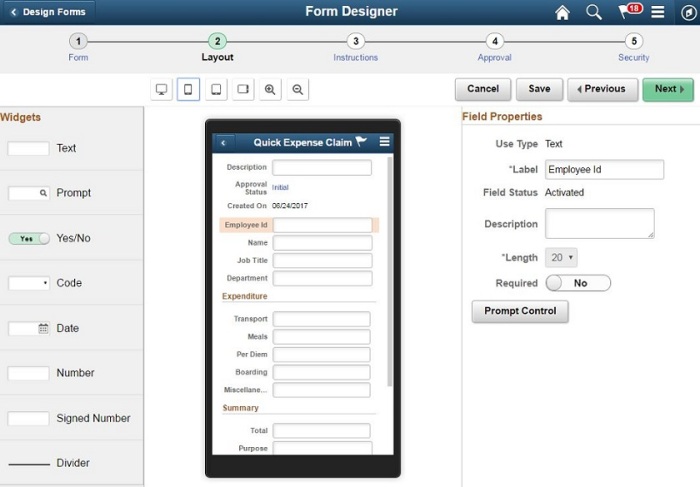
- Use Form Designer utility to build and deploy a fluid form, making use of the full set of features like file attachments, workflow approvals, security
- Deployed form can be added to a Fluid Homepage
- Optionally you can set a image for the tile
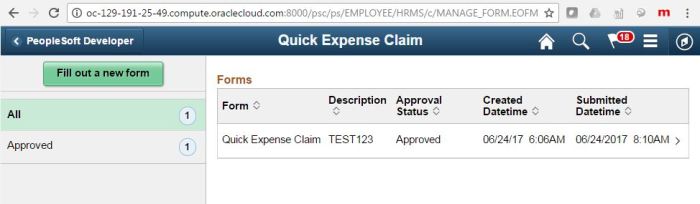
- When the form is accessed, initial component that is loaded – EOFM_CONTAINER_FL. This component basically acts as an index listing the forms already created and allows user to create a new form
- When user clicks to fill a new form, the form layout page opens, notice the Fluid Component for this page is – EOFM_FORM_FL. This is the component to which the Peoplecode needs to be mapped.
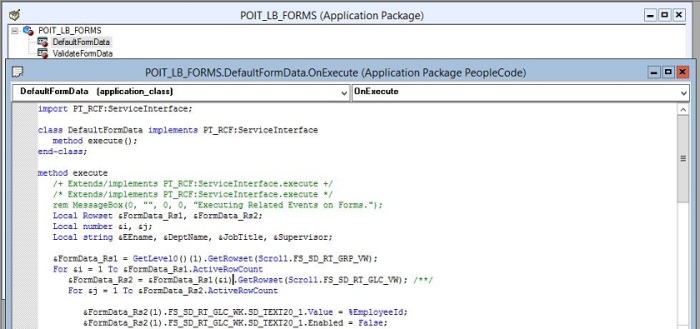
- Create an application package and class that contains the Peoplecode to execute your business rules. Record/Fields associated with the Form data elements can be figured out by reviewing the structure of the component – EOFM_FORM_FL
- Register the Application Package/Class Peoplecode as a service under,
PeopleTools>Portal>Related Content Service>Define Related Content Service

- Associate this new service to the target forms component under,
PeopleTools>Portal>Related Content Service>Manage Related Content Service
Note: Component – EOFM_FORM_FL as delivered is not available on the portal registry, so this has to be first registered in the portal, so that related events can be mapped.

- Test the functionality to suit your requirements
Note:Peoplecode event mapping framework in PeopleTools 8.55 has capability to inject custom Peoplecode into component and component record field level events. This functionality is further enhanced in PeopleTools 8.56 providing more Peoplecode events such as page activate etc.
Update May 2019:
If you are PeopleTools version 8.56+, map the App Package Peoplecode to ‘Post Page Activate’ in the event mapping framework. So your code gets executed last.
Value defaulted to form fields only get saved, only when “&c_sdcontroller.updateField…..” gets executed for each value assignment.
Below is working code to pre-populate a form with a list of default value. In this example a list of direct reports are defaulted for a specific manager id.
import PT_RCF:ServiceInterface;
import FS_SD:Runtime:Controllers:*;

class SetFormData implements PT_RCF:ServiceInterface
   method execute();
end-class;

Component FS_SD:Runtime:Controllers:SDRuntimeController &c_sdcontroller;
Component FS_SD:Runtime:Controllers:SDSearchController &c_objSDSearchController;

method execute
   /+ Extends/implements PT_RCF:ServiceInterface.execute +/
   Local Rowset &rsFormDataLvl1, &rsFormDataLvl2, &rsDirectRpts;
   Local string &strLabelFldNm, &strAssgnmntFldNm;
   Local number &i, &j, &k;
   &rsDirectRpts = CreateRowset(Record.POIT_FORM_DIR_V);
   &rsDirectRpts.Fill("WHERERVISOR_ID=:1", %EmployeeId);

   If GetLevel0()(1).FORM.FORM_TYPE.Value = "XXXXXXXXX" And
         GetLevel0()(1).FORM.FORM_APPR_STATUS.Value <> "A" Then
      &rsFormDataLvl1 = GetLevel0()(1).GetRowset(Scroll.FS_SD_RT_GRP_VW);
      For &i = 1 To &rsFormDataLvl1.ActiveRowCount
         &rsFormDataLvl2 = &rsFormDataLvl1(&i).GetRowset(Scroll.FS_SD_RT_GLC_VW);
         For &j = 1 To &rsFormDataLvl2.ActiveRowCount
            For &k = 1 To &rsDirectRpts.ActiveRowCount;
               &strLabelFldNm = "EMPLOYEE ID" | &k;
               If &rsFormDataLvl2(&j).FS_SD_RT_GLC_WK.SD_FLDNAME.Value = &strLabelFldNm Then
                  &rsFormDataLvl2(&j).FS_SD_RT_GLC_WK.SD_FLDNAME.Value, &strAssgnmntFldNm);
                  &rsFormDataLvl2(&j).FS_SD_RT_GLC_WK.SD_TEXT5_2.Value = &rsDirectRpts(&k).POIT_FORM_DIR_V.EMPLID.Value;
                  &rsFormDataLvl2(&j).FS_SD_RT_GLC_WK.SD_TEXT5_2.DisplayOnly = True;
                  &c_sdcontroller.updateField(&rsFormDataLvl2(&j), &rsFormDataLvl2(&j).FS_SD_RT_GLC_WK.SD_TEXT5_2);
                  Break;
               End-If;
               &strLabelFldNm = "NAME" | &k;
               If &rsFormDataLvl2(&j).FS_SD_RT_GLC_WK.SD_FLDNAME.Value = &strLabelFldNm Then
                  &rsFormDataLvl2(&j).FS_SD_RT_GLC_WK.SD_TEXT30_1.Value = &rsDirectRpts(&k).POIT_FORM_DIR_V.GetField(@("Field.NAME")).Value               &rsFormDataLvl2(&j).FS_SD_RT_GLC_WK.SD_TEXT30_1.DisplayOnly = True;
                  &c_sdcontroller.updateField(&rsFormDataLvl2(&j), &rsFormDataLvl2(&j).FS_SD_RT_GLC_WK.SD_TEXT30_1);
                  Break;
               End-If;
               &strLabelFldNm = "JOB TITLE" | &k;
               If &rsFormDataLvl2(&j).FS_SD_RT_GLC_WK.SD_FLDNAME.Value = &strLabelFldNm Then
                  &rsFormDataLvl2(&j).FS_SD_RT_GLC_WK.SD_TEXT30_1.Value = &rsDirectRpts(&k).POIT_FORM_DIR_V.JOBTITLE.Value;
                  &rsFormDataLvl2(&j).FS_SD_RT_GLC_WK.SD_TEXT30_1.DisplayOnly = True;
                  &c_sdcontroller.updateField(&rsFormDataLvl2(&j), &rsFormDataLvl2(&j).FS_SD_RT_GLC_WK.SD_TEXT30_1);
                  Break;
               End-If;
            End-For;
         End-For;
      End-For;
   End-If;

end-method;


No comments:
Post a Comment