Sample PeopleCode to Create XML file – BI Publisher Report

 In Bi Publisher there are three methods to create XML files as data source.

  1. PS Query Based
  2. Row-set Based
  3. Manually Creating XML file

To create XML files through PS Query and Row-set methods, need to import delivered App package ”PSXP_XMLGEN

PeopleCode to create XML file through Rowset:

Local Rowset &rsRowset;

Local File &fXMLFile, &fXSDFile;

Local string &strXSDFileName, &strXMLData, &strXMLSchema, &strPSHome;

Local PSXP_XMLGEN:RowSetDS &objRowsetDS = create PSXP_XMLGEN:RowSetDS();

&strFileName = &filename;

&rsRowset = &rs;

&strXMLFileName = %This.XMLFilePath | &strFileName | “.xml”;

&strXSDFileName = %This.XMLFilePath | &strFileName | “.xsd”;

/*******************Create XML Schema File *****************/

&strXMLSchema = &objRowsetDS.getXSDSchema(&rsRowset);

&fXSDFile = GetFile(&strXSDFileName, “w”, %FilePath_Absolute);

&fXSDFile.WriteLine(&strXMLSchema);

&fXSDFile.Close();

/*******************Create XML File *****************/

&strXMLData = &objRowsetDS.getXMLData(&rsRowset, &strXSDFileName);

&fXMLFile = GetFile(&strXMLFileName, “w”, %FilePath_Absolute);

&fXMLFile.WriteLine(&strXMLData);

&fXMLFile.Close();

PeopleCode to create XML file manually:

Local XmlDoc &inXMLDoc;

Local XmlNode &xRootNode, &xMonthNode, &xAmountNode, &xSummaryNode;

&inXMLDoc = CreateXmlDoc(“<?xml version=’1.0′, encoding=’UTF-8’STANDALONE=’yes’?><ROOT/>”);

&inXMLDoc.DocumentElement.AddAttribute(“xmlns:xsi”,

“http://www.w3.org/2001/XMLSchema-instance&#8221;);

&xRootNode = &inXMLDoc.DocumentElement.AddElement(“MAIN”);

&xSummaryNode = &xRootNode.AddElement(“SUMMARY”);

&xMonthNode1 = &xSummaryNode.AddElement(“JAN”);

&xMonthNode1.NodeValue = String(&nbrAmount);

&xMonthNode2 = &xSummaryNode.AddElement(“DEC”);

&xMonthNode2.NodeValue = String(&nbrAmount);

/*To add Child Nodes dynamically either through For loop or While Loop*/

&sqlSummary=CreateSQL(“SELECT MONTH,AMOUNT FROM PS_TEST_TBL”);

While &sqlSummary.Fetch(&nbrMonth, &nbrAmount)

&xDataNode = &xRootNode.AddElement(“SUMMARYDATA”);

&xMonthNode = &xDataNode.AddElement(“MONTH”);

&xMonthNode.NodeValue = &strMonth;

&xAmountNode = &xDataNode.AddElement(“AMOUNT”);

&xAmountNode.NodeValue = String(&nbrAmount);

End-While;

&strXMLFileName = %This.FilePath | &strFileName | “.xml”;

&fXMLFile = GetFile(&strXMLFileName, “w”, %FilePath_Absolute);

If &fXMLFile.IsOpen Then

&strXMLData = &inXMLDoc.GenFormattedXmlString();

&fXMLFile.WriteLine(&strXMLData);

&fXMLFile.Close();

Else

Error (“Temporary XML file creation failed. Please contact your System Administrator”);

End-If;

PeopleCode to display a report in PDF format:

Import PSXP_RPTDEFNMANAGER:*;

Local string &strRptDefnId, &strTemplateId, &strLanguageCd, &strOutputfmt, &strOutDest;

Local date &dtAsofdate;

Local Rowset &rsOutput;

Local PSXP_RPTDEFNMANAGER:ReportDefn &objReportdefn;

&strFileName = “HSampleExample”;

&strRptDefnId =” HSAMPLE”;;

&strTemplateId = “HMAHANTA_1”;

&strOutputfmt = “PDF”;

&strLanguageCd = “ENG”;

&dtAsofdate = %Date;

&strXMLFileName = %This.XMLFilePath | &strFileName | “.xml”;

&strOutDest = %This.XMLFilePath;

&objReportdefn = create PSXP_RPTDEFNMANAGER:ReportDefn(&strRptDefnId);

&objReportdefn.Get();

&objReportdefn.SetRuntimeDataXMLFile(&strXMLFileName);

/*To store the PDF report with the given name, provide the following properties to the report definition object*/

&objReportdefn.OutDestination = &strOutDest;

&objReportdefn.ReportFileName = &strFileName;

/*Generate and Display PDF Report*/

&objReportdefn.ProcessReport(&strTemplateId, &strLanguageCd, &dtAsofdate, &strOutputfmt); CommitWork();

/*To display the report on line*/

&objReportdefn.DisplayOutput();

/*To print the report*/

&objReportdefn.PrintReport();

/*PeopleCode to delete the XML file created after displaying the report */

try

Local File &fTempFile = GetFile(&strXMLFileName, “W”, %FilePath_Absolute);

&fTempFile.Delete();

catch Exception &ExCleanup

Warning (“Clean-Up of temporary XML File failed with Exception:” | &ExCleanup.ToString());

end-try;

Note: For printing .XLS/.XLSX format output reports in process monitor logs/report repository in BI Publisher reports , We need to add below piece of code in your App Engine.

SELECT PRCSOUTPUTDIR FROM PSPRCSPARMS WHERE PRCSINSTANCE = %ProcessInstance;

Next, Assign the value of PRCSOUTPUTDIR to Report definition object.

&oRptDefn = create PSXP_RPTDEFNMANAGER:ReportDefn(“Report_ID”);

&oRptDefn.Get();

&oRptDefn.OutDestination = “Value from PRCSOUTPUTDIR”;

Working with Pagelets as Fluid Tiles


Scenario-1: Create PeopleSoft Fluid tile with Data Source as PeopleSoft Pagelet.

Step 1: Create PeopleSoft Pagelets.

Step 2: Create Content reference with fluid parameters.

Step 3: Publish the content reference as Fluid tile.

Step 1: Create PeopleSoft Pagelets:

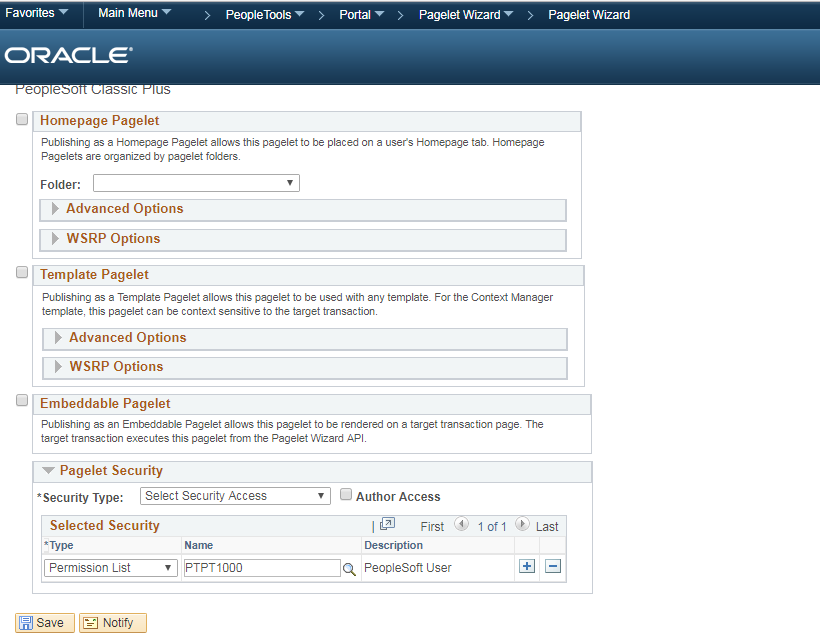
Navigation to create the PeopleSoft Pagelets:

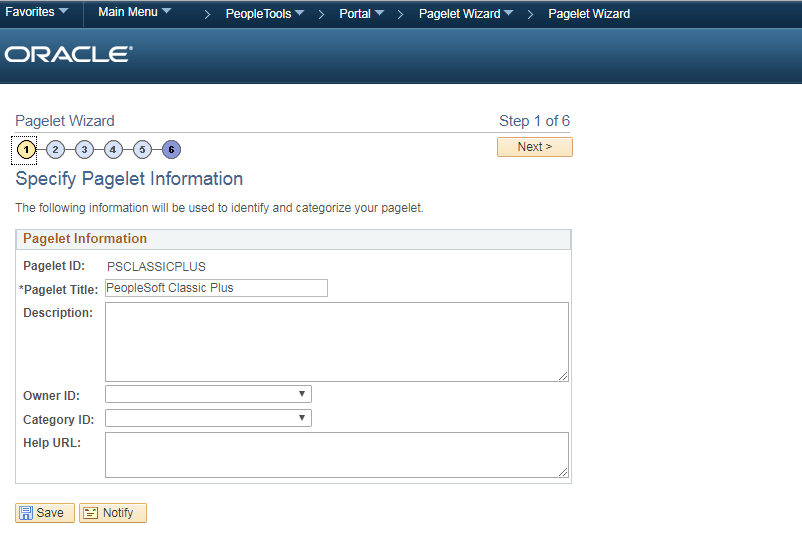
Root >> PeopleTools >> Portal >> Pagelet Wizard >> Pagelet Wizard

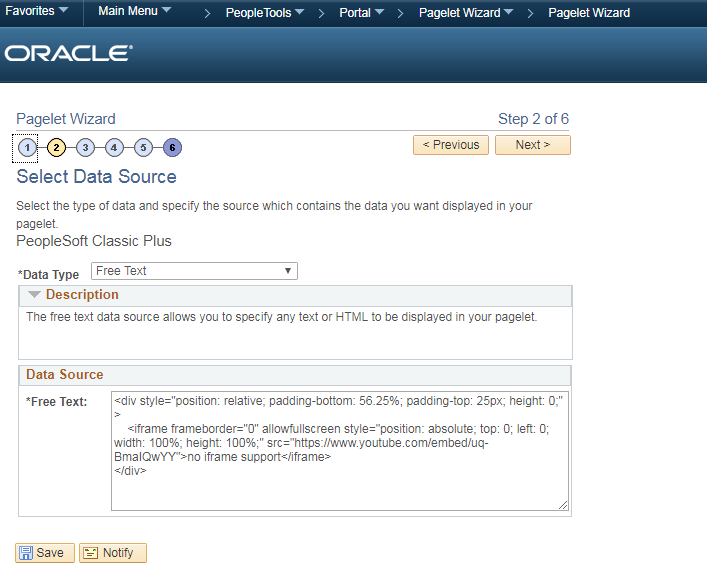
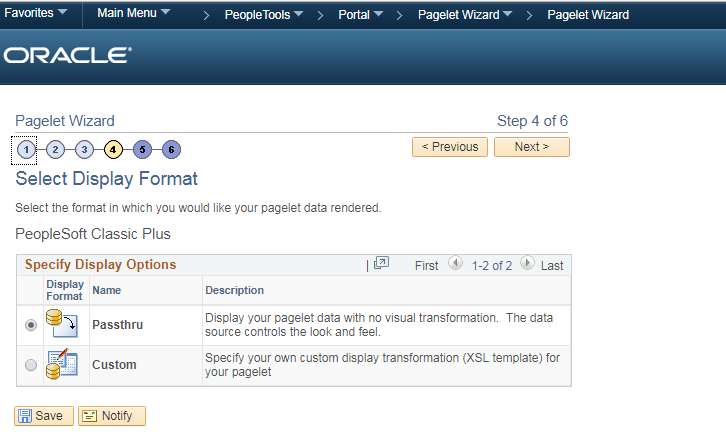
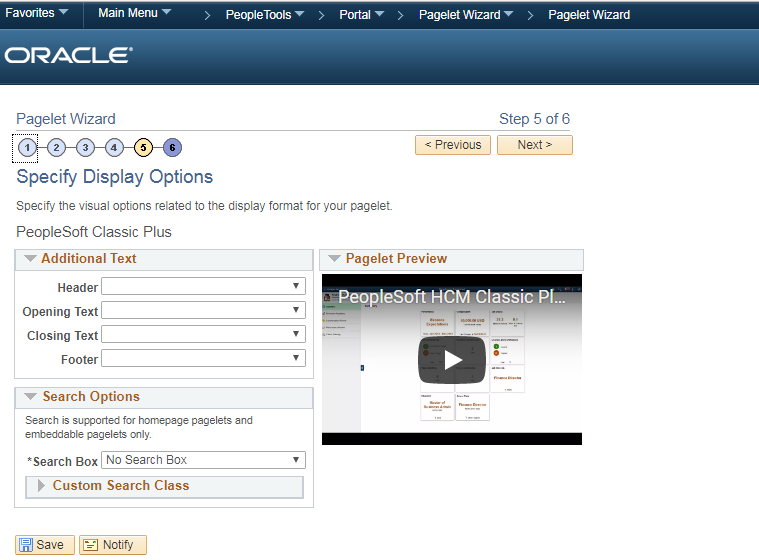
Now, In this Example, Embedding the PeopleSoft classic plus YouTube video into PeopleSoft Pagelet.

1.PG2.PG


3.PG4.PG5.PG

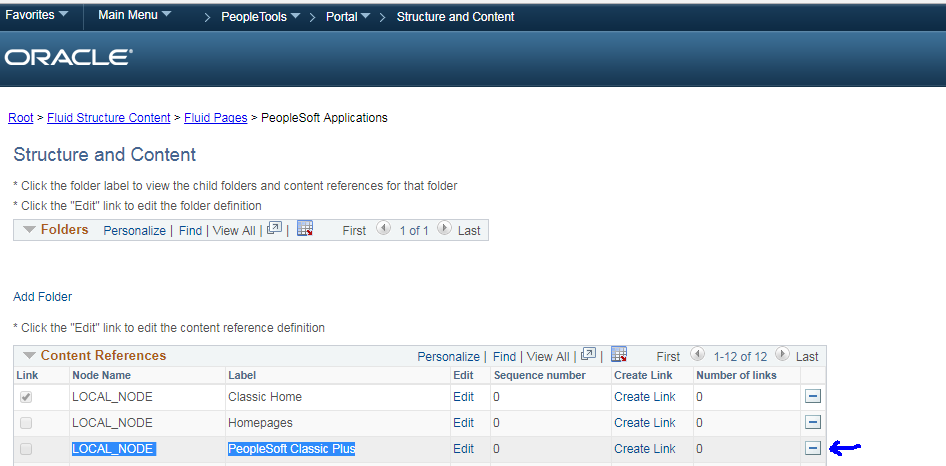
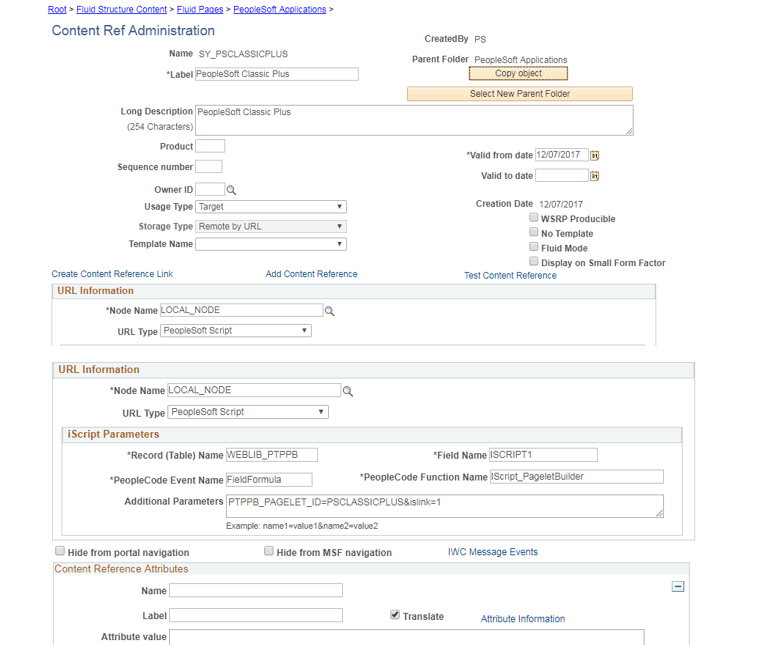
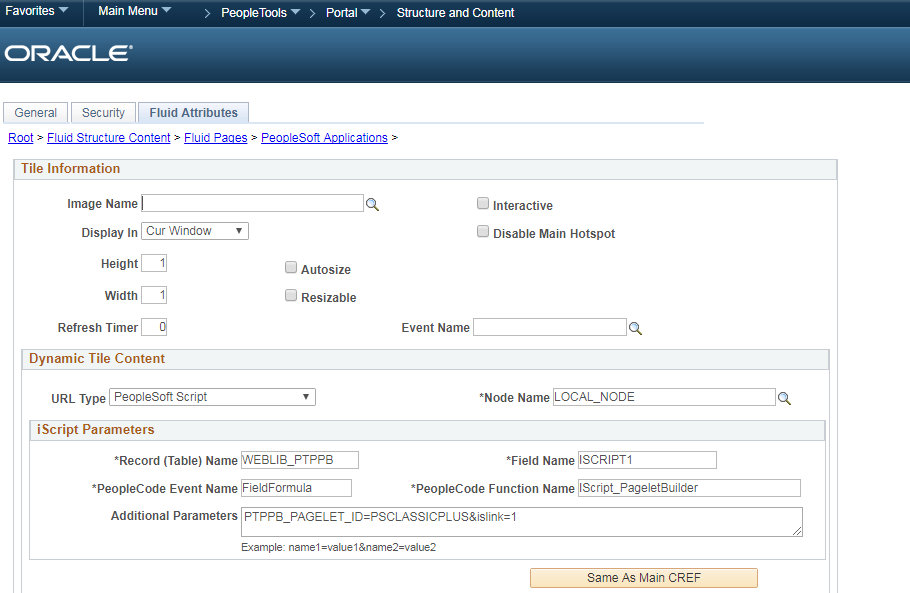
Step 2: Create Content reference with fluid parameters:-

Now, create the content reference in specific folder with parameters as shown below.

1.SC

2.SC

3.SC

Step 3: Publish the content reference as Fluid tile:

Next, Publish the Pagelet embedded Content reference in fluid landing page.

3.FT

Click on “Add Tile” button.

4.FT

Traverse into your created content reference location.

5.FT

Scenario-2: Create a fluid tile with Data Type as “Navigation Collections” and place the Fluid tile in Fluid landing Home Page.

Navigating: Main Menu>People Tools> Portal>Tile Wizard

pg-2

Click on “Create a New Tile” push button.

Here, provide our tile name and title and then click on “Next” button.

fnc-1

In the tile data source Information page select data type as ” Navigation Collection” and provide our Navigation Collection name Starts with ADMN_ as shown below.

fnc-2

fnc-3

Then click on “Next” button.

In Target page information we need to provide owner ID,Parent folder, sequence Number and target page security.

In this example i have given public Security as shown below. Then click on “Next” button.

FNC 4.PNG

In Tile Layout Properties page we need to provide “layout properties and tile repository details” details as shown below. Then click on “Next” Button.

FNC 5.PNG

Next, Review the details and Publish the tile by clicking on “Publish” button.

fnc-6

Now, this tile is published as shown below.

FNC 7.PNG

Now Fluid tile has been added to landing page as shown below.

fnc8

By clicking on “PeopleSoft Developer” Tile it will be redirected to below page.

fnc-9

The Procure to Pay Process - P2P

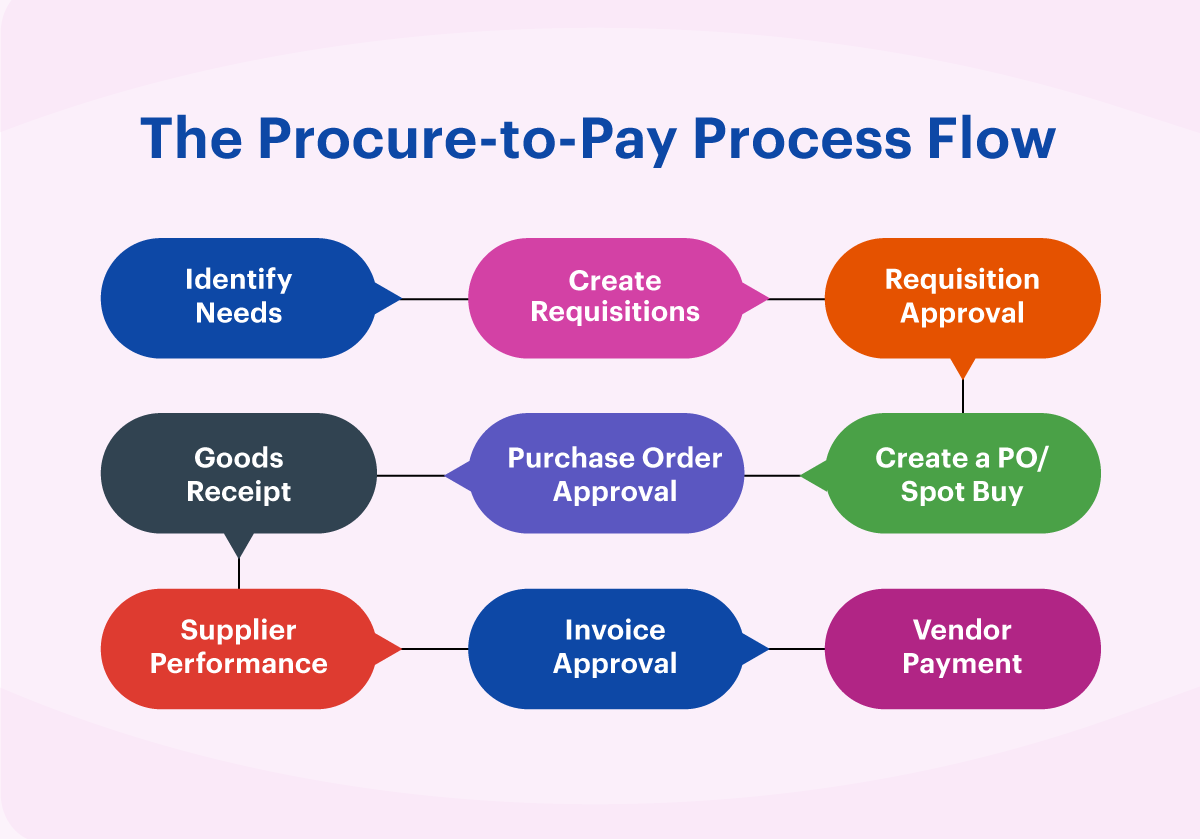
Based on organizational practice and the requirement in question, procurement leaders choose to complete the most relevant stages of a procure-to-pay process. Here are nine logical steps of an ideal procure-to-pay process.

procure to pay processLogical steps of an ideal procure-to-pay process. 

This post explains the Procure-To-Pay process in layman’s terms.

Lets take the following scenario – A person wants to buy a car.

The tasks associated with this can be listed out as below :

1. Identify the car
2. Identify the vendor
3. Check for discounts available
4. Place the order
5. Receive the car
6. Make payment

The above are the major tasks that the person would have to do for getting the product at his place of choice. So, for understanding’s perspective, tasks 1 through 5 are grouped under Procurement or Purchasing while task 6 is a part of Payment or Payables.

Extending the understanding to an organizations’s perspective, we have the following :

Requester - The person who raises the request for an item. This could be anyone within the organization, authorized to raise purchasing requests.

Buyer – Generally a person from the Purchasing department. This person is tasked with collating all the items requested by various Requestors and placing purchasing orders to the vendors.

Vendor / Supplier – The person or an organization tasked with supplying the requested item.

Receiver – A person who receives the requested item.

Invoice – A document provided by the vendor to the buying organization having details of the item like item description, quantity, amount, tax and total amount payable.

So, going back to our earlier scenario :

Requestor is the person looking to buy a car. Buyer is the person who will identify the vendor, check for discounts and place the order. Vendor (or supplier or dealer in this example) will ship the car that will be received by the Receiver. Vendor will also send an invoice that will be paid by the buying organization.

This is how a typical Procure-To-Pay process works in an organization. Of course, in reality it is not so simple and has other functionalities / processes within each of the major tasks that we just saw.

A more detailed examination of this P2P process will be discussed in my subsequent posts. That will focus more on PeopleSoft terminologies and processes.

PeopleSoft Procure to Pay links Purchasing and Payables modules to provide control and visibility over the entire life-cycle of a transaction – right from the way an item is ordered to the way that the final invoice is processed.

If you are starting out as a Procure to Pay consultant, this list of tables will be a quick reference for you. The main application tables used in the Procure to Pay cycle are listed here.

Master data tables

ModuleTable NameDescription
APVENDORVendor Header
PO, INITEMItems
GLGL_ACCOUNT_TBLAccounts
GLDEPT_TBLDepartments
GLPRODUCT_TBLProducts
GLPROJECT_FSProjects
GLOPER_UNIT_TBLOperating Units
POMASTER_ITEM_TBLItem Master Header
PO, ININV_ITEMSInventory Item master
INSTOR_LOC_INVStorage Location Definition


Transaction tables

ModuleTable NameDescription
APVOUCHERAP Voucher Header
APDISTRIB_LINEVoucher Distribution Lines
APPAYMENT_TBLAP Disbursements
APPYMNT_ADVICEAP payment Advice Information
APVENDORVendor Header
APBUS_UNIT_TBL_APAP Business Unit table
AMASSETAsset general Information
AMASSET_ACQ_DETAsset Acquisition Detail
AMDEPRECIATIONDepreciation transactions
AMCOSTAsset Cost Transactions
POREQ_HDRRequisition header
POREQ_LNRequisition line
POPO_HDRPurchase order header
POPO_LINEPurchase order line
ARITEMCustomer Items
GLJRNL_HEADERJournal Headers
GLJRNL_LNJournal Line Data
INCM_ONHAND_VWOn hand quantity
INCM_INTRANSITInventory in transit
INTRANSACTION_INVInventory Transactions
ININ_DEMANDOrder Request
INPHYSICAL_INVPhysical Inventory


Accounting tables

ModuleTable NameDescription
APVCHR_ACCTG_LINEAP Accounting entries
AMDIST_LNAM Accounting entries
GLLEDGERLedger Data
ARITEM_DSTAR Accounting entries
POPO_LINE_DISTRIBPOline accounting entries
INCM_ACCTG_LINEINV Accounting Distribution


Excel to Component Interface Utility

  To use the Excel to Component Interface utility, you must grant access to the iScript WEBLIB_SOAPTOCI in the permission list of the user w...