Asset Management and Accounting Basics(GL)

 What is Salvage Value?

Salvage value is the amount that an asset is estimated to be worth at the end of its useful life. It is also known as scrap value or residual value, and is used when determining the annual depreciation expense of an asset. The value of the asset is recorded on a company’s balance sheet, while the depreciation expense is recorded on its income statement.

Using Salvage Value to Determine Depreciation

The estimated salvage value is deducted from the cost of the asset to determine the total depreciable amount of an asset.

For example, Company A purchases a computer for $1,000. The company estimates that the computer’s useful life is 4 years. This means that the computer will be used by Company A for 4 years and then sold afterward. The company also estimates that they would be able to sell the computer at a salvage value of $200 at the end of 4 years. The company follows a straight-line depreciation method.

Salvage Value

What is Straight Line Depreciation?

With the straight line depreciation method, the value of an asset is reduced uniformly over each period until it reaches its salvage value. Straight line depreciation is the most commonly used and straightforward depreciation method for allocating the cost of a capital asset. It is calculated by simply dividing the cost of an asset, less its salvage value, by the useful life of the asset.

Straight Line Depreciation Formula

The straight line depreciation formula for an asset is as follows:

Annual Depreciation Expense Formula

Where:

Cost of the asset is the purchase price of the asset

Salvage value is the value of the asset at the end of its useful life

Useful life of asset represents the number of periods/years in which the asset is expected to be used by the company.

Additionally, the straight line depreciation rate can be calculated as follows:


Straight Line Depreciation Rate Formula

How to Calculate Straight Line Depreciation

The straight line calculation steps are:

  1. Determine the cost of the asset.
  2. Subtract the estimated salvage value of the asset from the cost of the asset to get the total depreciable amount.
  3. Determine the useful life of the asset.
  4. Divide the sum of step (2) by the number arrived at in step (3) to get the annual depreciation amount.

Straight Line Example

Company A purchases a machine for $100,000 with an estimated salvage value of $20,000 and a useful life of 5 years.

The straight line depreciation for the machine would be calculated as follows:

  1. Cost of the asset: $100,000
  2. Cost of the asset – Estimated salvage value: $100,000 – $20,000 = $80,000 total depreciable cost
  3. Useful life of the asset: 5 years
  4. Divide step (2) by step (3): $80,000 / 5 years = $16,000 annual depreciation amount

Therefore, Company A would depreciate the machine at the amount of $16,000 annually for 5 years.

The depreciation rate can also be calculated if the annual depreciation amount is known. The depreciation rate is the annual depreciation amount / total depreciable cost. In this case, the machine has a straight-line depreciation rate of $16,000 / $80,000 = 20%.

Depreciation Table

What Is Depreciation?

In accounting terms, depreciation is defined as the reduction of the recorded cost of a fixed asset in a systematic manner until the value of the asset becomes zero or negligible.

An example of fixed assets are buildings, furniture, office equipment, machinery etc. The land is the only exception that cannot be depreciated as the value of land appreciates with time.

Depreciation allows a portion of the cost of a fixed asset to the revenue generated by the fixed asset. This is mandatory under the matching principle as revenues are recorded with their associated expenses in the accounting period when the asset is in use. This helps in getting a complete picture of the revenue generation transaction.

1) Straight-line depreciation method

This is the simplest method of all. It involves the simple allocation of an even rate of depreciation every year over the useful life of the asset. The formula for straight-line depreciation is:

Annual Depreciation expense = (Asset cost – Residual Value) / Useful life of the asset

Example – Suppose a manufacturing company purchases machinery for Rs. 100,000 and the useful life of the machinery are 10 years and the residual value of the machinery is Rs. 20,000

Annual Depreciation expense = (100,000-20,000) / 10 = Rs. 8,000

2) Unit of Production method

This is a two-step process, unlike the straight-line method. Here, equal expense rates are assigned to each unit produced. This assignment makes the method very useful in assembly for production lines. Hence, the calculation is based on the output capability of the asset rather than the number of years.

The steps are:

Step 1: Calculate per unit depreciation:

Per unit Depreciation = (Asset cost – Residual value) / Useful life in units of production

Step 2: Calculate the total depreciation of actual units produced:

Total Depreciation Expense = Per Unit Depreciation * Units Produced

What is Net Book Value?

Net book value (NBV) refers to the historical value of a company’s assets or how the assets are recorded by the accountant. NBV is calculated using the asset’s original cost – how much it cost to acquire the asset – with the depreciation, depletion, or amortization of the asset being subtracted from the asset’s original cost.

Calculating Net Book Value

The formula for calculating NBV is as follows:

Net Book Value = Original Asset Cost – Accumulated Depreciation

Where:

Accumulated Depreciation = Per Year Depreciation x Total Number of Years

Sample Calculation of Net Book Value

Let’s put in the example of the logging truck mentioned above. If the logging company purchased the truck for $200,000 and the truck depreciated $15,000 per year for 4 years, the calculation of NBV would look like below:

Accumulated Depreciation = $15,000 x 4 years = $60,000

Net Book Value = $200,000 – $60,000 = $140,000

What is the Balance Sheet?

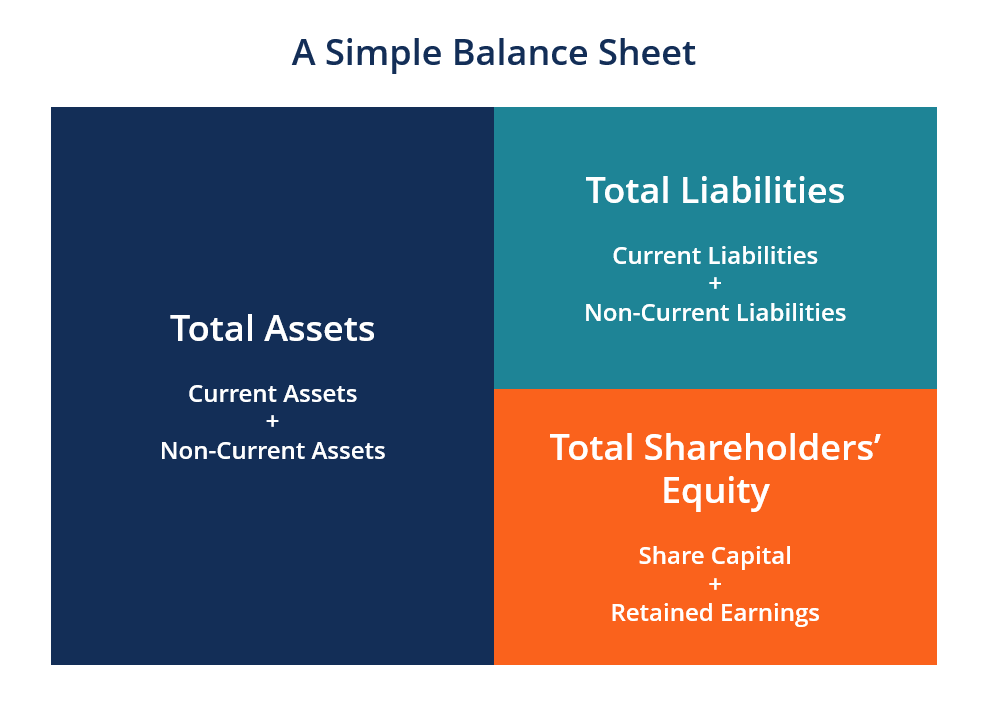
The balance sheet is one of the three fundamental financial statements and is key to both financial modeling and accounting. The balance sheet displays the company’s total assets and how the assets are financed, either through either debt or equity. It can also be referred to as a statement of net worth or a statement of financial position. The balance sheet is based on the fundamental equation: Assets = Liabilities + Equity

Balance Sheet Example

Below is an example of Amazon’s 2017 balance sheet taken from CFI’s Amazon Case Study Course.  As you will see, it starts with current assets, then non-current assets, and total assets.  Below that are liabilities and stockholders’ equity, which includes current liabilities, non-current liabilities, and finally shareholders’ equity.
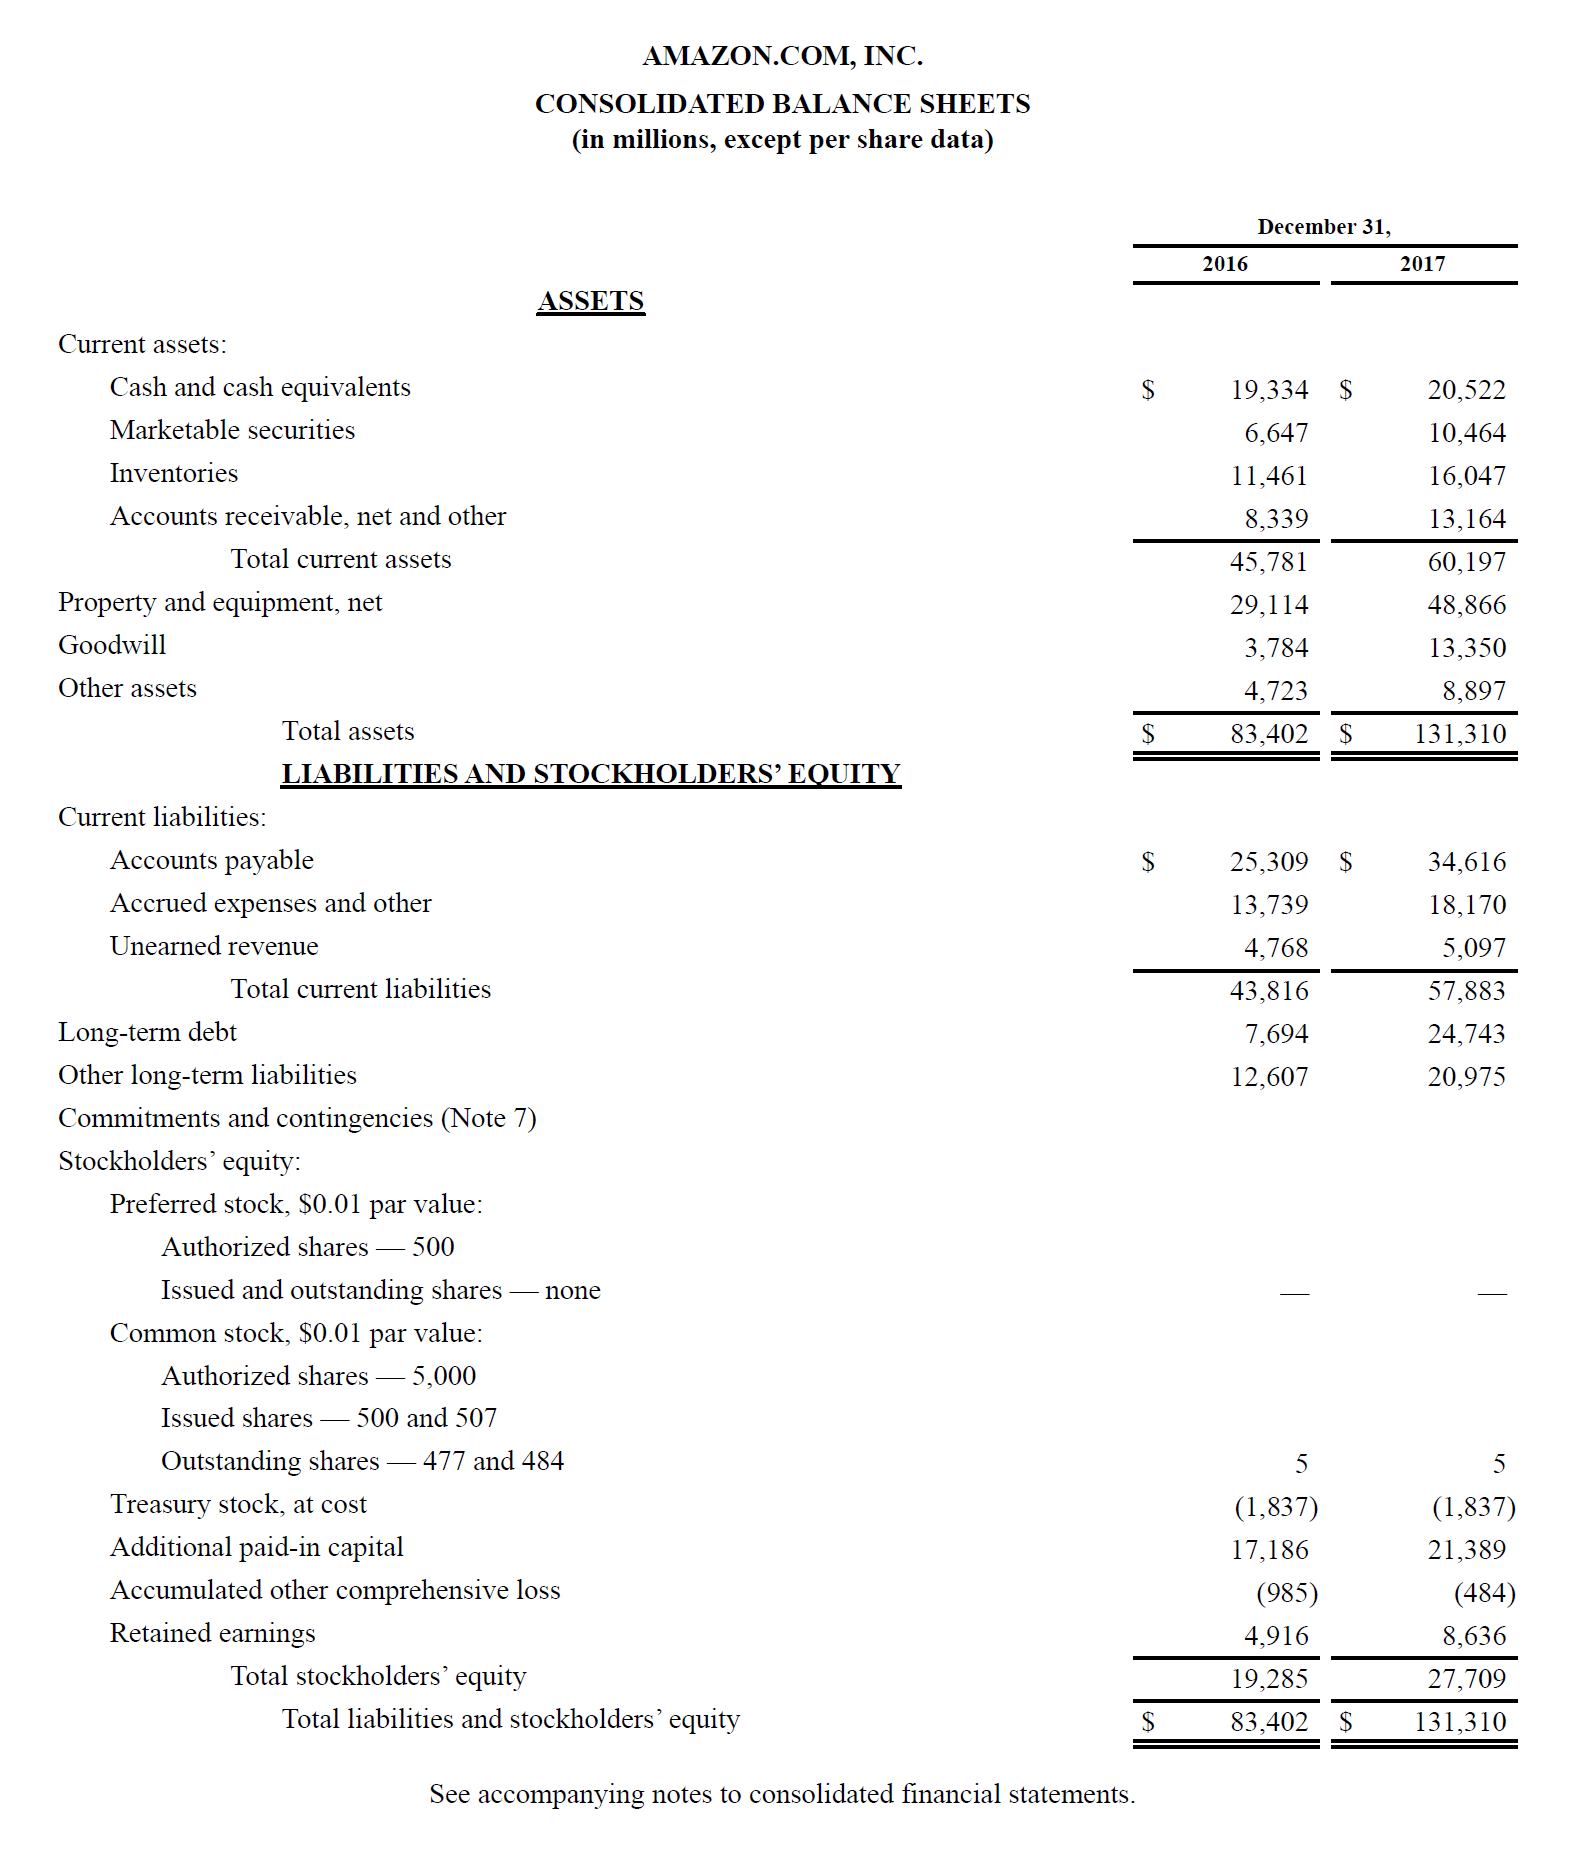
Amazon's balance sheet, example.

Illustration of a Balance Sheet

I

How is the Balance Sheet used in Financial Modeling?
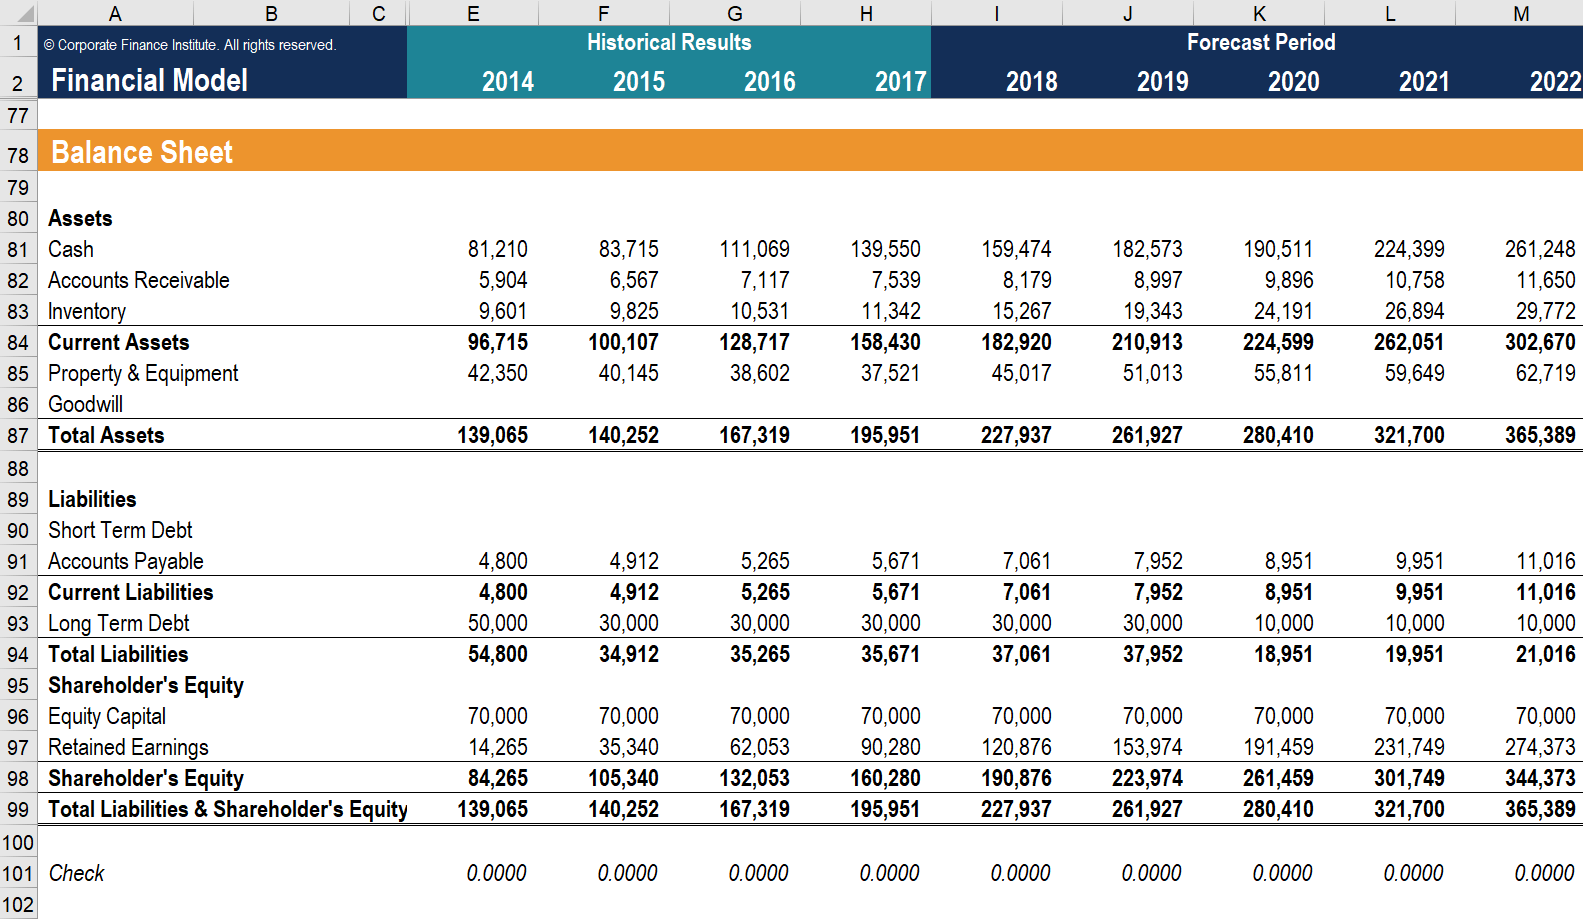
Changes in balance sheet accounts are also used to calculate cash flow in the cash flow statement. For example, a positive change in plant, property, and equipment is equal to capital expenditure minus depreciation expense. If depreciation expense is known, capital expenditure can be calculated and included as a cash outflow under cash flow from investing in the cash flow statement.

Balance Sheet Example from a Model

What is a Trial Balance?

A trial balance is a report that lists the balances of all general ledger accounts of a company at a certain point in time. The accounts reflected on a trial balance are related to all major accounting items, including assets, liabilities, equity, revenues, expenses, gains, and losses. It is primarily used to identify the balance of debits and credits entries from the transactions recorded in the general ledger at a certain point in time.

Below is an example of a Company’s Trial Balance:
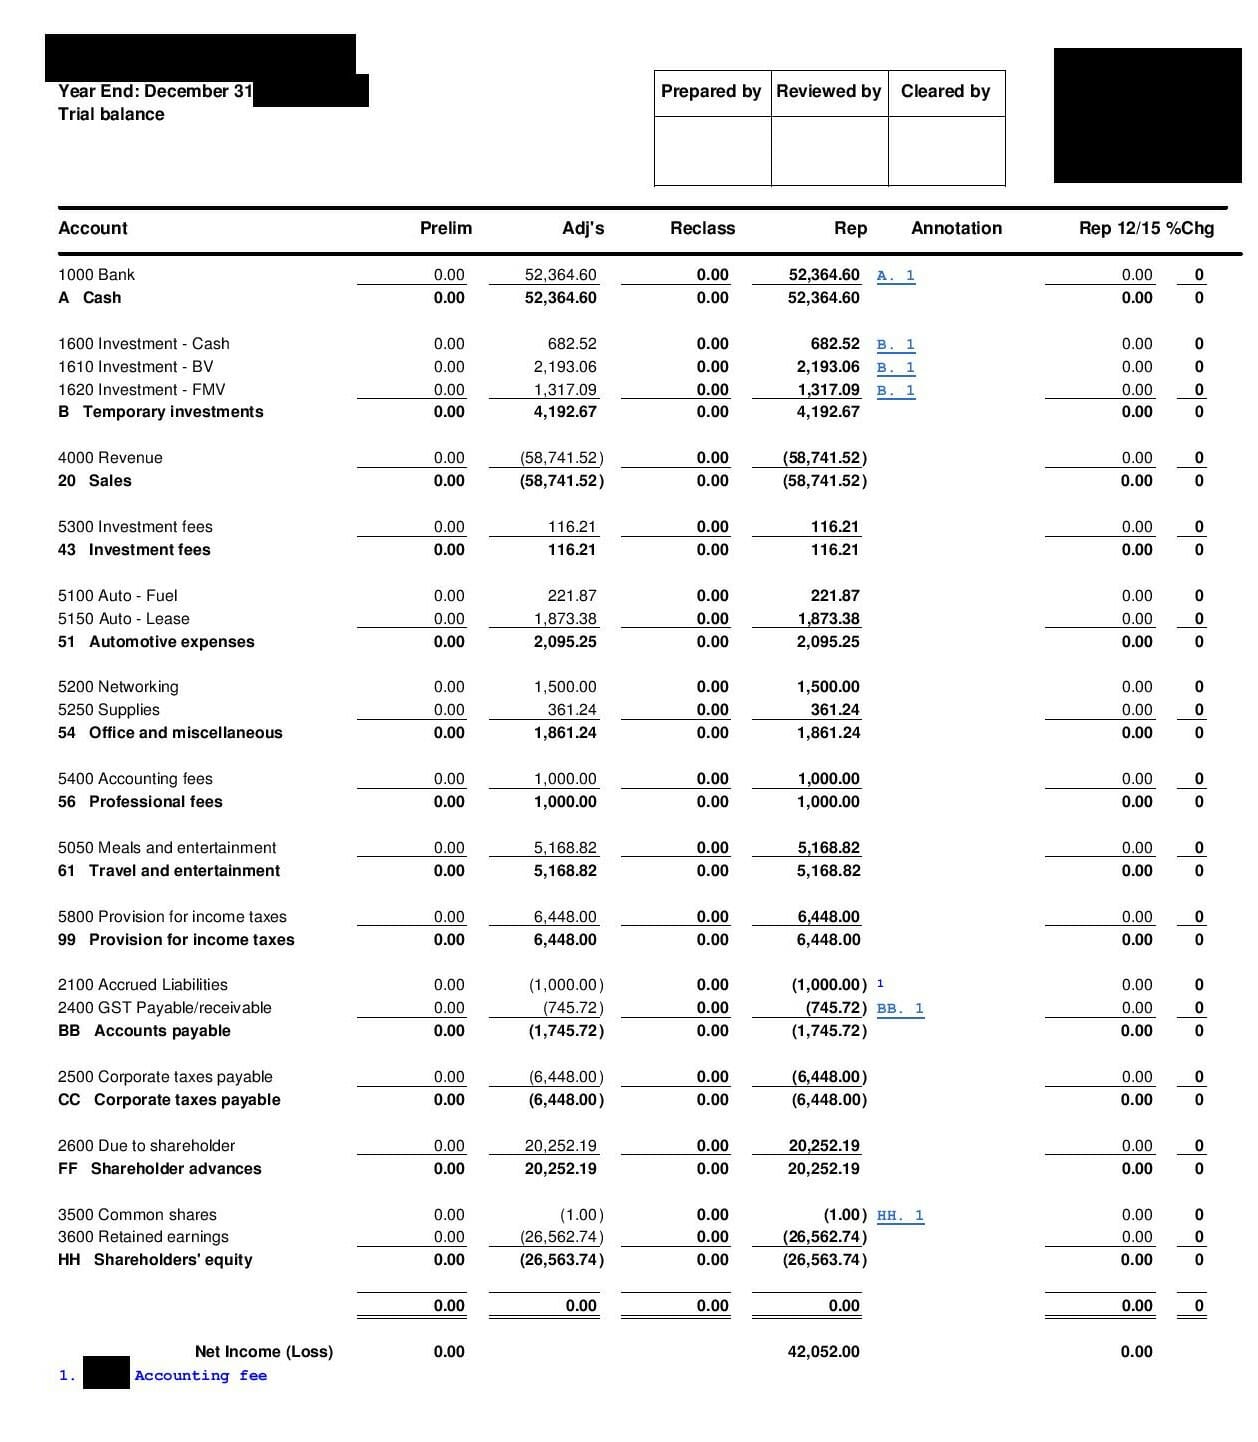
trial balance example

What Does a Trial Balance Include?

A trial balance includes a list of all general ledger account totals. Each account should include an account number, description of the account, and its final debit/credit balance. In addition, it should state the final date of the accounting period for which the report is created. The main difference from the general ledger is that the general ledger shows all of the transactions by account, whereas the trial balance only shows the account totals, not each separate transaction.

Finally, if some adjusting entries were entered, it must be reflected on a trial balance. In this case, it should show the figures before the adjustment, the adjusting entry, and the balances after the adjustment.
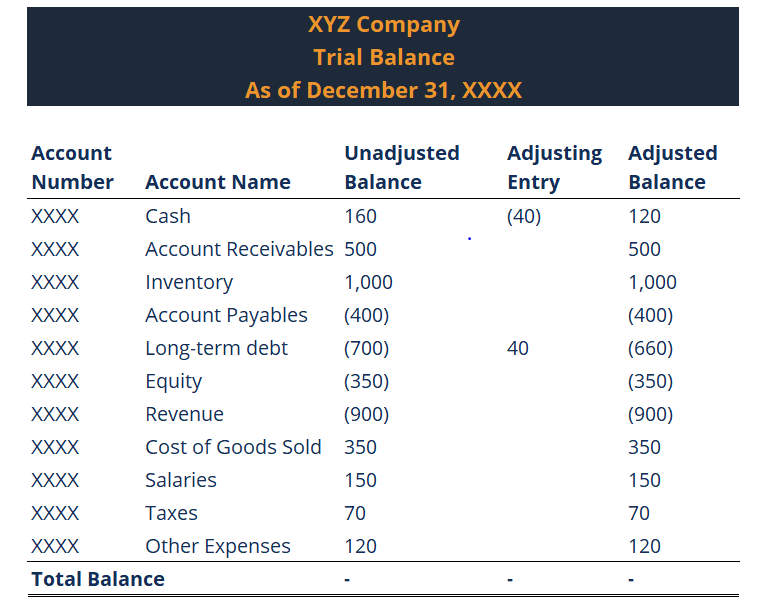
 

Trial Balance spreadsheet


What is the Income Statement?

The Income Statement is one of a company’s core financial statements that shows their profit and loss over a period of time.  The profit or loss is determined by taking all revenues and subtracting all expenses from both operating and non-operating activities.

The income statement is one of three statements used in both corporate finance (including financial modeling) and accounting. The statement displays the company’s revenue, costs, gross profit, selling and administrative expenses, other expenses and income, taxes paid, and net profit in a coherent and logical manner.
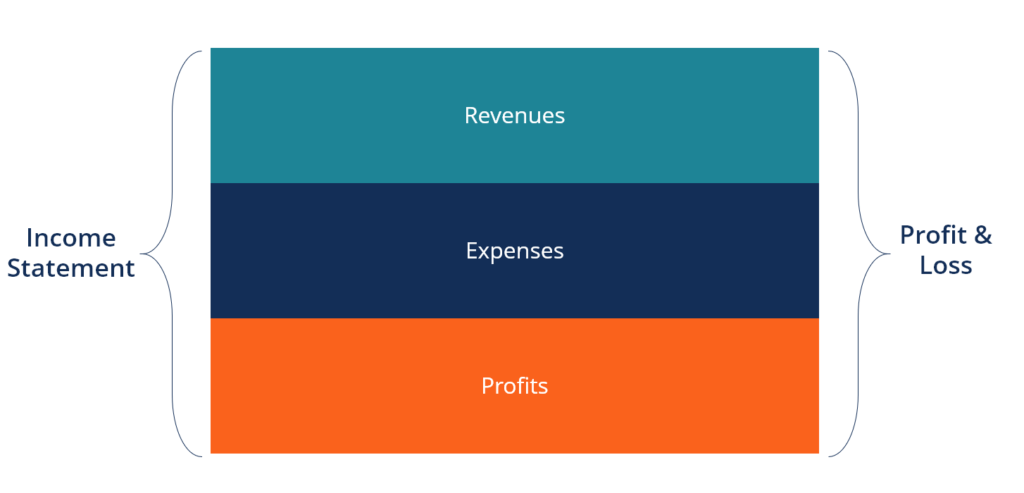
income statement diagram

The statement is divided into time periods that logically follow the company’s operations. The most common periodic division is monthly (for internal reporting), although certain companies may use a thirteen-period cycle. These periodic statements are aggregated into total values for quarterly and annual results.

This statement is a great place to begin a financial model, as it requires the least amount of information from the balance sheet and cash flow statement. Thus, in terms of information, the income statement is a predecessor to the other two core statements.
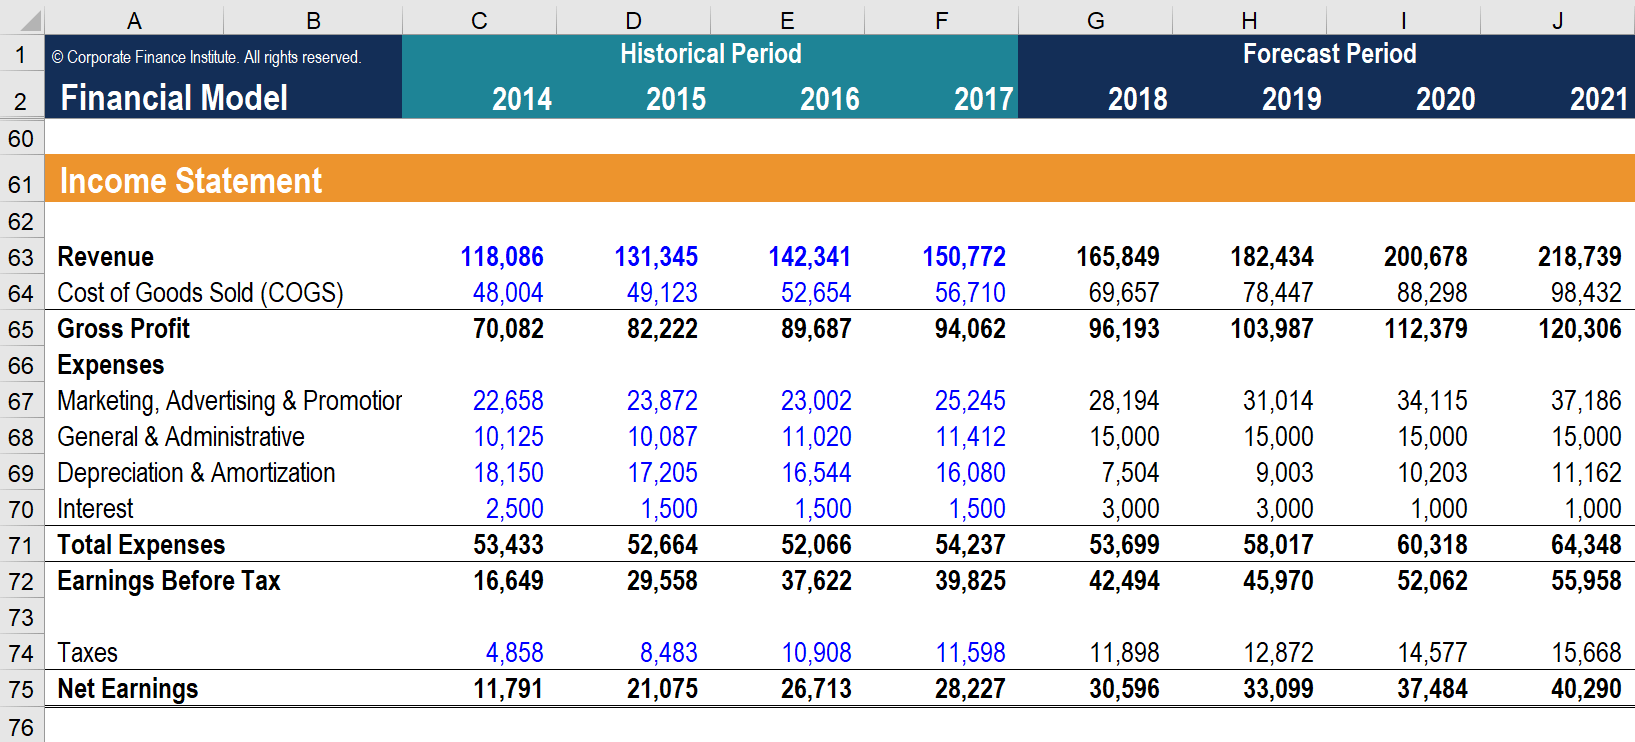
Simple income statement from a financial model

Fetch browser data into Component Buffer

 Let's assume we have a Page with a single Field DESCR (Description).  We're going to use JavaScript to fetch the Operating System of the local machine.  A button will then pass that back to the Component Processor and in the FieldChange event we'll display the Operating System name in the DESCR field.


(1) First I need to get my Javascript into the page.  There are many ways to do this but for this example I'm just going to add an HTML area to the page and set it's value to be my JavaScript during the PageActivate of the Page.

This is my JavaScript to get the Operating System.

<script>

// Get the Operating System name from the appVersion property*/
var OSName="Unknown Operating System"; 
if (navigator.appVersion.indexOf("Win")!=-1) OSName="Windows"; 
if (navigator.appVersion.indexOf("Mac")!=-1) OSName="MacOS"; 
if (navigator.appVersion.indexOf("Linux")!=-1) OSName="Linux"; 

// Set the hidden field on page using the PageField Name
document.getElementById("MY_DESCR1").value = OSName;

// The hidden field can also be referenced by using RECORD_FIELDNAME
// document.getElementById("GRS_TEST_WRK_DESCR1").value = OSName;

</script>
And the code to inject this into my Page at runtime.

NOTE: When the HTMLAREA value is set in PageActivate the JavasScript at this stage has not been rendered in the browser and therefore it hasn't executed yet.  This is important to note as anything which the JavaScript does on the page at render time will not be available to the Component Processor until the next rountrip.

ALSO NOTE:  It might matter where you put your JavaScript on the page.  HTML pages do not load all at once and so HTML elements that your JavaScript reference may not have rendered at the time they execute and may not be available.  For the purposes of this simple test we can get away with adding the JavaScript to the end of the Page but a much more thorough discussion on this can be found here  https://www.kirupa.com/html5/running_your_code_at_the_right_time.htm

(2) Pass the JavaScript variable to the local PeopleSoft Page.  Fields on a PeopleSoft Page are located inside the <FORM> object so that when the next HTTP POST event (or roundtrip) occurs the collection of Field objects or (HTML INPUT elements) in the form are posted (sent) back to the web server and then to the application server to be made available in the Component Buffer.

Normally we use data entry elements on the Page to capture human input but in this instance our JavasScript is doing the inputting.  However, we don't necessarily want our Operating System name to be visible on the Page so we add a hidden Field on the Page and set the value of this using JavaScript. In this example the hidden Field name is DESCR1 and we're going to make it invisible.

Setting the Page Field Invisible property not only makes the field hidden from human view but the way in which PeopleSoft does this (quite rightly) is to not include the Field in the HTML page response thus making it invisible to JavaScript too.  We solve this problem by also setting the Generate in HTML property and Modifiable by Javascript* property.


NOTE: If you don't set the Modifiable by Javascript property then you'll get this error.

This is because the HTML element for the Field will be present in the HTML but is not permitted to be changed. Actually, JavaScript will modify the Field value but the next roundtrip will catch this illegal operation and throw the error.  This feature might be useful if you wanted to apply some special HTML/CSS wizardry to  Field data but didn't want to display the default PeopleSoft styled Field.

One other Page Field property is useful to set on our hidden field and that's the Page Field Name.  All Page Fields can be referenced by the RECORD_FIELDNAME and this is set as the Element ID.  However, as we all know, it's possible to have the same Field appear multiple times on a page and having a method of uniquely identifying a specific instance of a Field is useful and sometimes essential.  


The line of JavaScript which sets the hidden field is this one:
/*Set the hidden field on page*/
document.getElementById("MY_DESCR1").value = OSName;
or, alternatively using the RECORD_FIELDNAME.  
// The hidden field can also be referenced by using RECORD_FIELDNAME
document.getElementById("GRS_TEST_WRK_DESCR1").value = OSName;
(There's a lot of useful information online to help understand how to reference HTML elements.  Here's a good place to start https://www.w3schools.com/js/js_htmldom_elements.asp ).

(3) Pass the hidden field into the Component Buffer.  Because our JavaScript has been used to set a field  the data is still on the local browser and will not be available to PeopleCode in any events until the next roundtrip.  This can be a Save, Refresh, non-deferred FieldEdit/Change, RowInsert/Delete, etc).  Think of it as if a human had just entered the data into a field.   

In Summary

If we put all this together this is what's happening.
1) We add our JavaScript is added to the page in Page Activate. (The JS hasn't run yet).
2) The Page HTML is generated by the Application Server and returned through WebLogic to the browser.
3) The browser renders the HTML and, if we've been clever (or lucky), our JavaScript will execute once the page is loaded.
4) The JavaScript grabs the data we're interested in and sets the value property of our InvisibleModifiable by JavaScriptGenerate in HTML enabled Page Field.
5) This Page Field is part of our Form and so will be passed back to be included in our Component Buffer during the next roundtrip (Save, Refresh, non-deferred FieldChange/FieldEdit, etc).
6) Once it's in the Buffer we can get to it like any other Field.

Did you know? Search Keys are shared from one Component to another ?

 Components which share the same Search Keys will always pass the Key values to the other.  

We can read about this standard behaviour in the  PeopleCode and the Component Processor > Search Processing in Update Modes

Alternatively, we can see this at work in any PeopleSoft system by navigating to 

PeopleTools > Security > User Profiles > User Profile

Search for any OPRID and open the User Profile Component

Now navigate to 

      PeopleTools > Security > User Profiles > Copy User Profile

and we'll see that it's automatically passed the OPRID from the first component into this one ready for you to use.

To demonstrate the issue we need to create a Fluid Navigation Collection which contains the portal folder User Profiles.


We can use the Tile Wizard to create a Fluid Tile which opens this Navigation Collection.

There's a bug in PeopleTools 8.58 (Patch 9 and earlier) which means that Search Keys are not passed from one Component to another if you're operating in the context of a Fluid Navigation Collection.  This might not seem like a serious issue but when users are working on multiple components for the same entity (e.g OPRID in our case here) then they'll soon notice this.  And, of course, the very reason we created the Nav Collection in the first place is to group related Components together to reduce the amount of time spent traversing the menu.

You can see the effect of this issue in the video below.


Solution

We might need to wait until this is fixed in a PeopleTools patch (currently targeted for patch 10 under Bug ID 31890562 )  See Doc ID 2714929.1

But, depending on the impact of the issue on your users you could provide a low impact workaround using Event Mapping and a Global variable.

On Component PreBuild of each component get the Keys from the Search Record and set a Global variable,

On SearchInit of each Component simply read the Global Variable and (optionally) set the SearchDialogBehavior(0) to force the processing of the Key. 

The video below is a quick walk through of this hack.


AWE Workflow Application Class Criteria

 How to write an App Class for use as AWE criteria. Here are the primary secrets:

  • Your App Class must extend EOAW_CRITERIA:DEFINITION:CriteriaBase (PTAF_CRITERIA:DEFINITION:CriteriaBase for 9.0 apps).
  • Your constructor must take a Record definition as a parameter.
  • Your constructor must set %Super by passing the criteria's ID. The following example uses the criteria ID value specified in the parameter record.
  • Your App Class must implement the Check(&bindRec_ As Record) Returns boolean method.

Here is a sample template:

import EOAW_CRITERIA:DEFINITION:CriteriaBase;

class MyCriteria extends EOAW_CRITERIA:DEFINITION:CriteriaBase
   method MyCriteria(&REC_ As Record);
   method Check(&bindRec_ As Record) Returns boolean;
end-class;

method MyCriteria
   /+ &REC_ as Record +/
   %Super = create EOAW_CRITERIA:DEFINITION:CriteriaBase(&REC_.EOAWCRTA_ID.Value);
end-method;

method Check
   /+ &bindRec_ as Record +/
   /+ Returns Boolean +/
   /+ Extends/implements EOAW_CRITERIA:DEFINITION:CriteriaBase.Check +/
   REM ** TODO evaluate something here;
   Return True;
end-method;

Pagelets in PeopleSoft

 Pagelets is a powerfull feature introduced in later releases of People Tools. Pagelets can be considered as the widgets or apps which are familiar to us in the internet websites. Pagelets brings in information from the transaction tables in a very presentable format or widget style. These pagelets will be smaller in size and can be added to HomePages, WorkCenters and Dashboards. There are three sizes for pagelets narrow, wide and banner sizes. The page/space where we host the pagelet can hold multiple pagelets at the same time.


It can be used to display simple yet compelling information like notice; high priority items awaiting your approval, frequently used metrics etc. On pagelets users can further filter down the data to get the more relevant data. These filters can be saved and are called as Personalization. Like the usual widgets you see around in the normal life, PeopleSoft pagelets also has the option to refresh the particular piece of information without disturbing the actual page where this pagelet is hosted. Thus the specific information can be updated without navigating away or reloading the entire page. We also have an option to auto refresh the pagelet every n seconds we specify. It will be particularly helpful in displaying time sensitive information.

Peoplesoft pagelets can be created by using different technologies which includes PeopleSoft Component, PeopleSoft iScript and javascript. The easiest one will be the PeopleSoft Component based pagelets. I will explain how to create PeopleSoft Component based pagelets in the rest of the content.

While creating pagelet, you should be extremely concerned about the performance of the system. Because the pagelet will be hosted in some other space where there can be multiple pagelets. So if one pagelet hangs due to bad design, then user won’t be able to work on any other pagelets hosted on the page. So you should design your pagelet in such a manner that, the data and the page will be loaded very fast.

Below are the steps to create Pagelet in PeopleSoft.

Step 1: Create a normal Page, design it the way you want to be displayed in the pagelet.

Step 2: Create another page which you want to use as a personalization option for the pagelet. In this page you will put fields which will act as input values/filters for the data that is displayed in the pagelet.

Step 3: Add the pages to corresponding components.

Step 4: Write any business logic, such as filtering the data in the first page based on the data from the personalization page and other business logic you want to implement.

Step 5: Add your component to a menu.

Till now you have been doing the regular steps in creating PeopleSoft components. Now you need to register this as a pagelet.

Step 6:  Go to Structure and content: People Tools > Portal > Structure and Content

Step 7: Navigate to: Root > Portal Objects > Pagelets > [Folder where you want to register]

Step 8:  Click on Add Content Reference

Step 9: Provide the content name, label, description etc. Give the usage type as Pagelet.


Step 10: In the URL information group box, provide the node, menu, market and component of the pagelet page (page created in step 1). Select the URL Type as PeopleSoft Component.


Step 11:  [Optional: required only if personalization is needed] On the pagelet Attributes group box, provide the menu, component and market for the personalization page (Page created in step 2). Select the URL Type as PeopleSoft Component. Populate the Refresh Time (sec) field with a value in seconds if you want your pagelet to be refreshed automatically every nth second.


Step 12: Save the Content reference.

Step 13: Go to: People Tools > Security > Permissions & Roles > Permission Lists and open the permission list which is supposed for the pagelet users and provide required access to the new components. Save the Permission List.

With the above simple steps you have successfully created a pagelet. Now in order to use the pagelet, select the pagelet from the corresponding pages personalization option and save it. For example, to add the new pagelet to the homepage, click on Home and on the home page select Personalization hyperlink. From the list of pagelets displayed, select your pagelet and click on save. When you go back to the homepage, you can see your pagelet in the homepage. Now you can drag to arrange the pagelet in the required order among the other pagelets.

PeopleCode OriginalValue and PriorValue

 OriginalValue


This a useful property of a field class if you want to revert the changes or compare with the previous value of the field.

&Value = RECORD.FIELD.OriginalValue;

This statement always returns the value of the field in the database at that particular point of time. For the same reason, this property will not work for derived records.
Say my field has value “FIRST” in the database and I change it to “SECOND” and save it. Let us analyze the return value at various point of time.

n  Component Loaded & value not yet changed.
&Value = RECORD.FIELD.OriginalValue; /* Returns FIRST */
&Value = RECORD.FIELD.Value;/* Returns FIRST */

n  After  changing the value to SECOND & before saving
&Value = RECORD.FIELD.OriginalValue; /* Returns FIRST */
&Value = RECORD.FIELD.Value;/* Returns SECOND */

n  After saving the changes
&Value = RECORD.FIELD.OriginalValue; /* Returns SECOND */
&Value = RECORD.FIELD.Value;/* Returns SECOND */


This function can be used to compare the value with previous value and do some complex functionality. It is, if the change in amount field is more than 10%, then trigger the workflow.
Another use case will be to revert the changes back if some criteria is not met.

Well this is quite useful, but if the field is a derived work record field, this property will not work at all. PriorValue() is a lifesaver here.

PriorValue


Although it is similar to OriginalValue, there is a notable difference. This always returns the value in the buffer just before the change.


Let me explain it. Suppose the value in data base is FIRST and after that I changes the value in the below pattern.

FIRST -> SECOND -> THIRD -> FOURTH


Now if I execute Original value, it will return FIRST where as PriorValue will return THIRD (the value just before the last change)

&Value = RECORD.FIELD.OriginalValue; /* Returns FIRST */
&Value = RECORD.FIELD.Value;/* Returns FOURTH*/ 
&Value = PriorValue(RECORD.FIELD); /* Returns THIRD */


The advantage is that you can use this function for a derived record also as the value is fetched from buffer and not from database.

Note:- There are two restrictions for usage of PriorValue to work correctly.

1.       It should be placed in FieldChange or FieldEdit events
2.       It  should be placed in the same record field event. For example if the record field is JOURNAL.JOURNAL_ID.  Then the code should be placed in either JOURNAL.JOURNAL_ID.FieldEdit or JOURNAL.JOURNAL_ID.FieldChange.

In all other cases PriorValue() will return the current value of field instead of prior value.

Excel to Component Interface Utility

  To use the Excel to Component Interface utility, you must grant access to the iScript WEBLIB_SOAPTOCI in the permission list of the user w...